Title

Title
Tally Ho!

Tuesday 30 April 2019

The Great Game - battle 3

Having lost the first battle the Russians were forced to retreat from the battlefield back towards their base of operations. They found themselves ambushed on the road as they pushed through a valley floor.

The scenario was a simple one - the Russians had either to break the Burpha attack or move as many people off the table end as possible. The Russians adopted a mostly defensive square formation in classic Colonial style, while the cavalry made a break for the hills.

Burpha sir - thousands of um


Close-up of the square with guns in the centre on a handy hillock

Russian horse make their escape

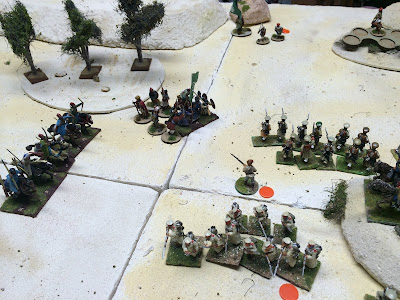
The initial fire from the Russians was effective in suppressing Burpha rifle fire forcing them to move forward with their assaulting troops. A key focus was on the end of the Russian square furthest from the escape point. Early in the game causalities were mounting for the Burpha and unit of Russian cavalry escaped scoring 3 VPs.

Burpha close-in for the attack

Another boldly charged up the valley sides routing a unit of riflemen and capturing a gun. Meanwhile in the valley floor the Russians were forced switch fire from the Burpha rifles to their combat troops. They repulsed several attacks but in turn began to take casualties and found themselves pinned a few times.

Cossacks take the high ground

The pins proved crucial as they allowed the Burpha to attack the narrow wend of square and make inroads into the Russian ranks. As the attacks intensified the square began to crumble at the end opening-up the space for further attacks.

Square starts to crumble


A combination of rifle fire and relentless assaults eventually over whelmed the square losing the Russians 10 VPs. So the final result was a 10-6 win for the Burpha and a third straight victory

Hanging on grimly

The last stand

It was a funny old game to be sure. Initially the Russians seemed in control and were easily supressing the Burpha fire. As the attacks grew though they had to switch targets and became overwhelmed. Perhaps the cavalry should have stayed and fought for longer, thus wiping-out a sizable part of the attackers shooting units?


Monday 22 April 2019

The Great Game - battle 2

A busy Easter weekend concluded with our second battle of the Great Game campaign using The Men Who Would Be King. The first engagement for the British was Get of my land, where the British had to patrol through a series of 6 zones looking to capture objectives along the way. There was no turn limit.


A sample objective
The British deployed tight on their right / centre leaving the left flank empty. The Burphas were required to deploy all non-Tribal units (before the Brits) with the remainder held off-table but assigned to one of the 6 zones. They spread-out evenly with their riflemen seeking to protect the objectives.
British left 

British right

Burphas right

Centre

Left
The British initially hugged the table-edge in a tight formation and opened-up a withering fire on the Burpha ranged troops. Shooting first they were lucky enough to chain together pins on the Burpha, meaning there was almost no return fire from their hapless foes.


With most of the visible enemy heavily damaged the British began their advance towards the objectives, lead by the Bengal Lancers (counting as Regular cavalry not lancers). They pushed past the first objective without stopping and on towards the second, hoping to force the Burpha to deploy in the open.  Meanwhile their foot-slogging compatriots cautiously advanced.

Bengal lancers on the move.


A gleam in their eyes the cavalry charged a unit of Burpha tribesmen (Fierce) that had freshly arrived. They pushed them back but took 60% losses. They charged again but were swamped and wiped-out.

Lancers ride to their doom
The follow-up units had a run of poor dice and were unable to move and so stood stalled in touching distance of the objective. Meanwhile on their left a large Burpha force that had been unengaged due to the British deployment finally closed-in on the their flank.

Critically the Burpha riflemen managed to pin the British and so the follow-up Burpha charge was able to wipe-out most of the unit guarding the flank. In a crucial move the British supporting unit decided not the fire but instead to move to block the flank.  A second Burpha charge badly damaged that second unit and turned the flank. We declared a Burpha win.


The British left crumbles 
Certainly a see-saw battle - early on the British seemed unstoppable as they mowed-down the natives with their firepower. Later as they became less cohesive they were vulnerable to melee attacks.  The lesson seems simple enough - if the western forces get 2-1 shooting at a Burpha unit they can grind them down pretty quickly and if the Burpha can get 2-1 charging at a British unit they can likely get one in.    


Sunday 21 April 2019

Forces of the Abyss - Succubi and Arch Fiend

My latest painting project is Kings of Wat forces of the Abyss, to accompany the Vanguard skirmish warband I recently completed. First off the painting table are units and large hero figure.

The Succubi are hard-hitting but fragile combat infantry which form the core of many armies. Figures are from Mantic with some Scotia terrain pieces to complete the bases.


The Arch Fiend is a big, nasty, flying combat hero who is also one of the sources of inspiriting Inspiring. At 300 points in his flying form he is a big investment though.

   
And finally -


Saturday 20 April 2019

A Tale of Two Forts - the game of two halves

This good Friday so the second outing for my Lizardmen / Salamanders in the Kings of War campaign against The Herd. Th scenario was Dominate (most unit strength within 12" of the centre) and having won the preceding Vanguard skirmish I could deploy 2 units a move forwards before the game.

Given the scenario I opted to place my key strike force in the centre (Ancients on Rinosaurs), flanked by the heavy infantry and preceded by plenty of skirmishers to soak-up the enemy charges. This meant the flanks would need to hold-on long enough for me to break through and turn outwards.    

The main battle line

Reverse view

The Herd adopted somewhat the opposite plan with stronger flanks and weaker centre hoping to turn inwards on me.

A fast right flank for the herd

The centre and left of The Herd
 I advanced smartly and largely got the better of the skirmishing with my troops pushing back The Herd and setting-up most of the charges I was looking for the centre.

Skirmishers clash in the centre


 I was also able to bog-down the nasty Stampede, but only for a turn rather than the two I hoped for.

Charge - pork is on the menu tonight 

The main challenge was on my left where the flying units found themselves out matched by several tougher flying units. Use of Critters Call denied a rounds shooting from the Skyaiders by disordering them.


About 3 moves in I got most of my central charges in but things began to unravel a little with a run of very bad dice. Rather than cutting through his Tribal Walker horde holding the centre in a couple of turns, a double 1 meant they held on for 3 against my Ancients. The same unit then had a nice charge set-up that would take it through 2 heroes and into the flank of his heavy infantry - this was again denied by a double 1 on the second hero.  

The main assault goes in

The Ancients ended turn 6 fighting back-to-back Glosters-style. I occupied the centre but not in enough strength to win the game. Some mistakes were made but the two double 1's really cost me the chance to possibly win it. I also need to review the deployments as I had one very weak flank that could nt really hold long enough.    

Back to back
     

Wednesday 17 April 2019

The Great Game - battle 1

The first game of our new campaign saw the Russian Imperial forces undertaking the Seek and Destroy scenario. The Russians get 3 VPs for each house destroyed by shelling/melee and the Burphas 2 VPs for each building intact or Russian unit routed. We upped the forces to 48 points a side as we had 6 players.

Russians: 5 * Reg Inf, 2 * Field Gun, 1 * Reg Cav and 1 * Irreg Cav
Burphas: 4 * Irreg Inf, 5 * Tribal Inf, 2 * Field Gun and 2 * Tribal Cav

The Burpha's deployed the bulk of their melee oriented Tribal infantry in the buildings and looked to pushed the remaining forces forwards to relieve them. The Russians focused most of their forces centrally with their horse on the left flank.
 
Set-up from the Russian side 


Burpha garrison

The early moves saw focused volley and artillery fire hit the Burphas hard, with units rapidly reduced to small size whilst the relief forces toiled across the table towards them. At this point things looked bleak for the Burpha but this battle is about time not casualties for them.    

Afghan deserters fighting for the Burpha


Burpha advance

About 6 turns in (half way through) the Russians has succeeded in defeating about a third of the Burpha but had not destroyed any houses and had not advanced beyond their base edge. With the Burpha beginning to close-in they began a cautious advance towards the town.  

The thin brown line


Burpha on the Russian right 

The Russians managed to launch a couple of attacks on the town but were unable to shift the fresh Burpha units that had reinforced the area. They were well ahead on the casualty count but still had caused no meaningful damage to any of the houses save one on 7 hits (10 needed to kill) from artillery fire.

Still not moved?


Afghans again in the house seeing most of the action 

By move 10 it was clear the attack had bogged-down and there was no way they could  destroy the 3-4 houses needed for the win. so a solid Bupha victory on points - they lost about half their forces for little damage to the Russians, but the later were too slow advancing to have a realistic chance to win the game.  


Russian dragoons mauled by the Burpha horse