Title

Title
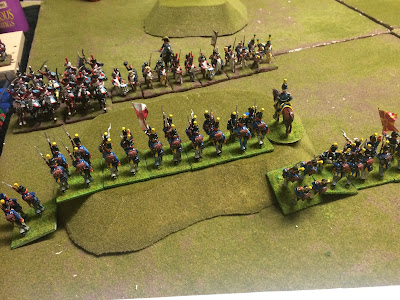
Tally Ho!

Wednesday 31 July 2019

Boarder Skirmish - a KOW campaign.

After a few weeks off Kings of War we began a new campaign, again featuring the Abyssals and Salamanders. This time we opted for a simple linear campaign that gave the option for trying out the siege rules. The rules all fit on one page, see below


The First Battle

Game one was a encounter at the boarder itself, with the winner being the one to seize and hold at least two of the three crossing points. The larger Abyssal force deployed with the fast units on the right, the main infantry units in the centre, with shooting support, and heavy infantry on the left. The Salamanders massed their hard hitting Rinosaurs on their right, the heavy infantry / battle platform in the centre and a refused left of infantry / Akelidons. 


Horsemen and Arch Fiend on the right

Molochs on the left

Lower Abyssals / Succubus in the centre 

Battle Platform and Ancients in the centre 

Rinosaurs ready to rumble on the right
Both sides advanced quickly in their centres looking to capture the bridge in the early moves. The Abyssals pushed forward on the right with the Arch Fiend looking to take-up a flanking position to exploit its flying ability. The Salamanders were more cautious on their right as they looked to inflict shooting damage on the Molochs before charging in.    


The Succubi were tempted across the river and routed an Ancients unit before being destroyed themselves by the Rinosaurs. The Archfiend gobbled-up an Akelidon but this bought time for the second Ancients to rout the Abyssal Horsemen guarding the ford.  


Over the next couple of moves the Salamanders were able to push back their opponents across the line but the marauding Arch Fiend pounced on the flanks and rear of several units, routing them from the table.  


In the end-game the Salamanders were able to hold two of the crossings and bear off the Arch Fiends final attack. A nice close game with the death of the Arch Fiend in turn 6 finally sealing it for the Salamanders. The Battle Platforms first outing was a decent one, with it proving well suited to camping on an objective.  


Saturday 27 July 2019

Key Points 1813 - battle 4 of the M&M campaign

After a weeks break we began round 2 of the campaign with the sides both attempting to capture the northern-most town that had been fought to a draw in the previous battle. The French had a small advantage having taken less cavalry casualties in the previous game.

The two sides choose contrasting strategies for the battle. The French opted to place most if the infantry against the town and to use their cavalry / artillery to delay the enemy. The Allies did not contest the town initially but looked to isolate it by attacking the flanks. Both sides deployed their cavalry on their right, so they were not initially opposing each other.  

long view from the French left

The French horse opposite the Swedes forming the allies left

Allied horse looking to sweep around the town and turn the French left 
On the French right their cavalry advanced cautiously but soon came against a solid line of Swedes. Lacking much support they managed a single charge from the Hussars before being pushed back. The French then adopted a more defensive posture and sent the bulk of the units to bolster the left.


Centrally the French advanced rapidly and within a couple of turns had captured the whole town and set about  reinforcing their position. Skirmishers were thrown forward which delayed the enemy advance bogged down the Hanoverians in a wooded area near the town.


The town is secure


After a considerable delay the Russians launched a limited attack against the French in the town but were halted by some accurate musket and artillery fire without  being able to launch a series assault.


The major allied effort was against the French left where they hoped to sweep around the town and isolate the troops garrisoning it. The advance was a steady one which allowed the French to feed troops from the right and centre  to oppose the attack.  


The initial cavalry clash favoured the Allies as their Russian cuirassiers routed their opposite numbers, but their blood-up they pursued off the table and took no further part. In the second clash the French dragoons triumphed over the Swedes and so left the Allies unable to contest the flank.  


With the French left secure and the whole town in their hands it was declared a victory for them. Its always interesting to have two distinct plans and the Allies approach could have worked, but perhaps their attack was too cautious and needed some infantry support to succeed?    

Thursday 11 July 2019

Key points 1813 - battle 3 of the M&M campaign


As there were only two battles in campaign turn 1 we moved this week into turn 2. We began with the French attacking the farm complex in square 10.

For this battle the aim was simply to capture both the farm complex's. The French had a potential edge in this game as they fielded 3 infantry and 1 cavalry brigades to the Allies 2 infantry and 1 cavalry. Given the scenario both sides opted for a weak centre and strong flanks opposite the farms. The French scattered their cavalry through line hoping to disrupt the enemies advance, whilst the Allies massed on their right seeking to sweep around the farm and isolate it.

View from the Allied left

Notable was that the Allies opted not to occupy the farm in their half, seeking to avoid an early artillery bombardment on them.

And from the Allied right

The allies advanced their cavalry rapidly seeking to attack behind the farm on the French left. The French attack was more cautious as they sought to force the Allies into square.


French main assault

The French responded by deploying their reserves to block the cavalry attack, using the farm as an anchor for the line. With the Allies hanging back the French pushed forward to capture the farm on the Allies left having quickly disposed of the unit pushed forward to capture it with a fierce artillery bombardment.

Hold them!


With about half the battle gone the Austrians finally began an attack against the farm on the French left seeking to support the now isolated Calvary. The Allied horsemen manged to rout a unit of French but were faced with a line of squares blocking their way.  


Steady the Buffs

The French's own attack fared better as they managed to pressure the Russians, pinning them to their base-edge and securing the farm on the Allied left.

Russians under pressure


Late in the game the Austrians tried to assault the farm on the French left but were easily repulsed. With the position clearly a poor one for the  allies they opted to quit the field leaving the victorious French holding both farms.


An interesting and decisive battle. It was a bold gambit by the outnumbered Allies but they failed to support the main attack by their cavalry, thus allowing the French to commit their reserves as the main line was not under pressure.


Saturday 6 July 2019

Key Points 1813 - battle 2 of the M&M campaign

The second clash of the campaign was a large affair (5 brigades a side) fought for the strategically vital crossroads at the centre of the map. Being such a large game we fought it over 2 weeks. The French fielded 2 cavalry and 3 infantry brigades against the Allies 4 infantry and 1 cavalry brigades.

There were three objectives to capture (hill, crossroads and farm), any two of which would give victory.

The allies deployed with cavalry on the right and a centre/left of infantry - the crossroads and farm looking like the main targets. The French mirrored the deployment, although their cavalry advantage made the hill and crossroads the main target.


Germans ready to attack the farm 

Russians opposite the hill

Massed French horse

Both sides advanced on the wings attacking the hill and farm. The outnumbered allied cavalry fought well with some good dice, but weight of numbers began to beat them back after a few turns. A well-placed French horse artillery battery assisting the cause greatly.


Around the farm the allies held the advantage. A series of initiative rolls in their favour allowed them to grab the farm and establish a good position. This flank became locked in a bitter firefight with neither side willing to risk combat.

The action around the farm 

Russians clinging to the hill for now


Centrally the allies suffered heavy losses from a massed French battery and so decided to launched an assault in column against the thinly held centre. This was beaten back by the waiting Swiss leaving the crossroads in a vulnerable position.  


Austrian assault in the centre stalls

Back at the hill and by week 2 the allied cavalry was finally vanquished, leaving the Russian infantry at risk of being flanked. Forced into square they were hit with cannister then charged by a column. This classic manoeuvre cleared the hill and left it in French hands.


The French capture the hill

Meanwhile at the crossroads the allies rallied a few routing units and were able to contest the objective. Neither side had the strength to launch an attack so this would be a draw here.

Stalemate


Finally the farm was still firmly in allied hands having withstood a couple of late French attacks.
So the battle ended 1-1 with the crossroads contested. As with the first battle the allies suffered the heaviest casualties, especially amongst their cavalry.