Title

Title
Tally Ho!

Tuesday 19 July 2016

Montrose Campaign - week 10

Banffshire April 1645 - Montrose Wins

Jezzer lookalike visits the club
This week we were joined by another guest who is usually only able to play during our weekend games. As a stunt double for Labour leader Jeremy Corbyn, this is an especially busy time, so we're grateful he was able to attend. As a special treat be brought along some of his recent painting including some Thirty Years War Cuirassiers.  

Scenario

In this scenario both sides infantry met whilst their Horse was our scouting for the enemy. Both sides Horse then rushed back to the battlefield arriving on opposite sides of the table. So essentially both sides have a flank attack against the other. The winner is the first to rout 50% of the enemy.

Covenanter Forces
On table
6* Foot (1 * Vets)
2 * Field artillery
Flank march
6 * Horse (2.5 regts)
2 * Foot

Montrose Forces
On table
3 * Vet Foot (Irish)
3 * Gordon Foot
3 * Highlanders
1 * Field artillery
Flank march
4 * Horse (2 regts)
1 * Light gun
2 * Foot 

The Battle

Both sides adopted a fairly similar deployment as they deployed with infantry holding the available high ground with guns in support. Montrose those extended his line so that his Highlanders slightly outflanked the Covenanters line.

Covenanter defensive line

Montrose deployment - Highlanders on the right
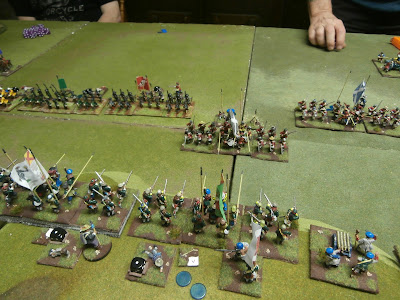
The two sides adopted different approaches to their flank attacks though. The Covenanters led with their Horse, seeking to crush the flank held by the Irish Brigade.

Covenanter Horse attack

Close-up of Nigel's lobsters 
Montrose led with his infantry, seeking to pin the Covenanters whilst the Horse and Highlanders attacked the dog-leg in the line.  

Montrose flank attack 
The game opened with the Covenanters Horse launching an all-out assault on the Irish Brigade holding the flank of Montrose line. The Veteran Irish were able to blunt the initial attack and then blazed-away at the Covenanter Horse. Some strong shooting, combined with poor morale from the Covenanters, led to the attack bogging-down causing only limited damage. 

Covenanter's attack
The attack stalls
Over on the other flank Montrose attack faired much better. A combined infantry and Horse attack was enough to pin the Covenanter Foot. This proved fatal as the Highlanders charged into the defenders flank and began to push them back

Highlanders attack the flanks
More centrally there was a rare event when Montrose Foot managed to comprehensively out-shoot the Covenanters leaving a gaping hole in the centre of their lines.
Gordon Foot closes in on the Covenanters

In Stuart's absence Richard takes-on the pointing duties
With their flank attack stalled and their centre in retreat it was clear that the Covenanters could not win the day. So they withdrew into the gathering April gloom.

Campaign Situation

Having achieved another victory Montrose now pulls into the lead controlling 8 territories to the Covenanters 5.

Tuesday 12 July 2016

Honours of War - our first game

Image result for honours of war

Background

This week we took a break from our current campaign ECW campaign and tried a new set of rules - Honours of War by Keith Flint. We are fortunate that the Cotswold is a hot-bed of wargaming authorship and so we were joined by the Keith himself to teach us the game. It turns out that Keith is a neighbour of the Stuart the Elder and followers of Keith's Blog will know they have played a couple of times recently.
 
So I dusted-off the 15mm Seven Years War troops and we prepared for an evenings play.     
 
We used the reduced distances for 15mm with unit frontages of 15cm. 
 

The Scenario

At Keith's recommendation we began with a small scenario from his book and so fought The Clash at Kutzdorf. We played British against French. The British are holding the high ground to the north of the table with the French attacking in force from the south.      
  
French first brigade - Swiss to the fore

French horse - Cuirassiers Du Roi and Schomberg Dragoons 
 
French second brigade - Walloons on the right

British battalion supported by artillery

A full brigade shot

British heavy dragoons

The defensive line 

The Battle

 
The battle opened with a general advice from the French, all except the Guards who's Dithering commander spent several turns parading his troops without actually advancing. On the French left the Light Infantry were first into action against the British. The disciplined British fire and close artillery support proved highly effective though, forcing back the initial French assault.  
    

Light Infantry and Walloons  lead the attack

The attack falters
The French Guards dress ranks....but not much else 
On the French right their cavalry brigade pressed forward around the village to engage the British horse. The initial clash went in favour of the British with their Superior heavy dragoons pushing back the Schomberg Dragoons  and later destroying the French Hussars. The French retaliated by routing the British Light Dragoons but the combat favoured the British on this flank.
 

Stuart the Elder points to his alter-ego commanding the French horse
 
The attack goes in
 
Initial honours to the British
Hussars badly outnumbered

Back on the French left they rallied the damaged infantry and mounted another attack on the British holding the ridge. This time they met with more success as the combined fire of two Light Infantry regiments was enough to rout a British battalion from the hill.

French second assault


British rout
In the centre the French doggedly advanced under artillery fire until they eventually came in range of the British. For most of the night the British had clung to their ridge not advancing a jot, so it was a great surprise when they doubled forward to attack the French.

On this occasion fortune did not favour the brave and they ran straight into a devastating French volley that sent them reeling back to the ridge with heavy damage.

French cut loose

A long shot of the field
And what of the Guard? Well once their commander was certain all was in order with their dress, they finally began a stately advance towards the village where they entered unopposed and took-up residence.

The village is secured
With the evening drawing to a close we agreed on a losing draw for the French. They had inflicted some damage but were not in shape to force the British from the heights.

British firing line

View from the hill

Verdict

This was an unusual game for Keith as it was the first outing in 15mm and a change from his usual Austria vs Prussian games. He also had 6 players to contend with who did nt know the rules! So a big thanks to him for an enjoyable evenings game and for teaching us the rules.

In hindsight we agreed that we should have started closer together - perhaps 30-40cm apart so there was less marching time needed given the reduced movement distances. It also exposes the attacker to less long-range artillery fire.

The rules as promised gave a fast and simple game with clear differences between good and poorer quality troops. The rules combine damage and morale using a single "hits" mechanism that sees units degrade, but with the chance to rally these hits once outside musket range.  So you get a nice ebb and flow as units come in and out of combat. Unfortunately darkness fell before we got a proper sense of how deadly sustained close-range fire is, but certainly multiple ranks seemed the order of the day as melees last 1 round and fire combats perhaps 2 rounds.

Again a big thanks to Keith and as he kindly left a copy of the rules we'll certainly be trying them again. So now its time to plot that SYW Russian army I've always had in mind and with Attack this weekend I will do well to resist. 


Friday 8 July 2016

Pacific Island Hopping - Flames of War

This week we completed our third game in the island hopping WWII pacific campaign. This saw the Japanese ejected from Saipan following a fierce struggle.

Campaign situation

A full battle report is at the end of the Flames of War campaign page.
Pacific campaign


The critical move

Tuesday 5 July 2016

Montrose Campaign - week 9

Aberdeenshire March 1645 - Montrose wins

Scenario

Following a period of inactivity during the inhospitable Scottish winter (which it turns-out is much like the English summer of 2016) hostilities recommenced with a Pitched Battle for control of Aberdeenshire. A simple scenario in which the winner must route 50% of the enemy.

Covenanter Forces
8* Foot (1 * Vets)
5 * Horse (2.5 regts)
2 * Field artillery
1 * Dragoons

Montrose Forces
3 * Vet Foot (Irish)
5 * Gordon Foot
3 * Highlanders
4 * Horse (2 regts)
1 * Light gun
1 * Field artillery


The Battle

The Covenanters choose to anchor their position with one flank resting on a fast-flowing river and the other on a small wood. This meant they had ceded the high ground to Montrose. The wily Royalist commander could immediately see that this meant any attack by him would be channelled into a narrowing gap and would be subject to flanking fire. The Covenanters also had superior artillery which would be damaging at close range. So unusually Montrose choose to defend and nullify the advantages in the enemies position.    

Covenanters left, with troops sneaking across the river

Covenanter right with Horse in the distance

Irish Brigade lining the hills
Taking-up the challenge, the Covenanters advanced across their front, hoping to turn Montrose right flank by attacking the Highlanders.

On their right the Covenanter horse clashed with their opposite numbers in a cavalry battle that was to last the whole game, with both sides effectively cancelling each other out. We've found that cavalry melee can be fairly lengthy unless one side has some luck early on.

Horse meet head-on

The cavalry combat ebbs and flows. Stuart points out his lancers advance

In the centre, the Covenanters Foot moved into position  and began a firefight with the Irish and Gordon's Foot lining the hills. Honours were fairly even at first, with Montrose's artillery proving ineffective despite the short range

Covenanter Foot attacks

Montrose-eye view of the attack

The left of the Covenanter line

The Irish Brigade stands firm 

A long-shot of the centre


On the left, the Covenanter's attempt to outflank Montrose were thwarted by advancing enemy Foot and the unexpectedly strong resistance of the veteran Highlanders against the Covenanter trotters.

Covenanter flank attack is halted

Eventually the Covenanters began to waiver, with them being outshot for perhaps the first time in the campaign. For once Irish Brigade escaped serious damage and Alastair McColla was able to escape injury. The game ended as a rare defensive victory for Montrose as Covenanters streamed from the field to escape into the growing darkness.
Montrose achieves a flanking position

Covenanter centre is collapsing

Campaign Situation

With the first battle of 1645 going to Montrose he is now once again ahead by two territories controlling 7 to 5.