Island Hoping Campaign


Background

This
campaign pits the Japanese against the US Marines in a fictional meeting
engagement as they try to capture an isolated chain of islands during the later
stages of the Pacific Campaign in WW II.
Campaign
Moves
Each
turn both sides may launch a single attack from an island that they hold
against a neutral or enemy-held island or they may launch a land attack on a
disputed island. Neutral islands are captured, but attacking an enemy-held
island results in a battle.
So
turns will typically consist of two battles or advances, one imitated by each
side.
Some
of the islands have a campaign effect:
- Controlling the airfield gives a free priority air support for one battle that turn.
- Controlling the port gives a free naval gun support (destroyer) for one battle that turn.
- Controlling the supply dump gives you +150 points for one battle that turn
The
Japanese begin holding Saipan, with the US on Guguan. The campaign opens with a
US assault on Saipan. The US must spend at least the first 3 turns attacking
Saipan. During this time the Japanese may not launch any attacks of their own. From
then on either side may launch an attack from any island they control
Fighting
battles
Islands
come in two types, large and small.
-
The small islands have both a beach and a interior that must be captured. The side holding the island is always the defender.
- Large islands have two landing beaches and an interior. This offers the chance for meeting engagement if both sides land simultaneously.
The
battles fought depend on the tactical situation on the ground and tries to
simulate the choices available on the ground. It is assumed that landings are
always opposed at the beach but should the invader get ashore the next step
could be an attack on the interior or a spirited counter-attack by the
defender. For the larger islands both sides might advance rapidly to seize an
objective before the battle settles-down to a more normal pattern.
These
concepts are captured in the flow-charts below. All battles are fought using
1750 points. Players may choose from the various Imperial Japanese or US
Marines army lists available.
Game 1 - US Invasion of Saipan - US Marines win
The scenario
The campaign began with the US marines attacking dug-in Japanese on the island of Saipan. In the Island Assault scenario the attacker must captured an objective placed near the centre of the table by the defender.
The Japanese opted for a fortified infantry battalion complete with pill boxes and barbed-wire. They deployed well-forward to try and stop the Americans as they left the beach. The US Marines featured a Sherman tank and lots of integral LTV(4) Buffalo armoured transports.
 |
| The right side of the Japanese position |
 |
| The left side of the Japanese position. The crashed Zero tail is the defenders objective |
The Battle
The Marines decided to focus on the left side of the Japanese defences as this was closest to the main objective and also allowed them to use terrain to shelter them from the AT-gun equipped pill-box in the centre. They were able to land in good order and advance quickly on the left of the position under cover of the dense terrain.
 |
| US tanks lead the advance |
 |
| US Marines storm ashore - Ooh Rah |
Emerging from the cover the Marines flanked the machinegun nest and assaulted the infantry platoon dug-in on the left of the Japanese line. Although the infantry assault on the machinegun nest failed the Marines overcame the defences. Fearing they would be overrun the Japanese launched an assault against the US armour and despite a storm of MG fire
Nikuhaku AT team attacked & destroyed the Sherman before succumbing.
 |
| Japanese are flanked |
 |
| The Sherman is lost |
Undaunted the Marines pressed forward and were able to establish a perimeter around the victory objective with their second infantry platoon. At this vital point the Japanese reinforcements arrived, firstly in the shape of tank platoon, closely followed by some infantry. Initially the tanks proved successful in shooting-up the vulnerable LTV's but the Marines integral AT weapons able to destroy and bail-out enough tanks to stall the attack.
 |
| Marines transports advance on the objective |
 |
| Japanese armour counter-attacks |
 |
| Marines dig-in around the objective |
As turn 9 arrived the Marines were firmly in control of the victory objective with a large infantry platoon supported by AT weapons and HMGs. With the Japanese unable to make any dents, victory belonged to the Marines.
 |
| Marines firmly in control |
 |
| Japanese counter-attack stalls |
Conclusions
An enjoyable evenings gaming albeit a late finish, as we had lots of new rules to learn. On reflection the Sherman was not a good buy as it was expensive but as vulnerable to the Nikuhaku AT team as lighter armour. About half-way through the Japanese looked to have been totally out manoeuvred but the counter-attack could easily have been more devastating with some better dice rolls, which would have denied the Marines the objective.
I suspect in the excitement we got lots of the special rules wrong, but we'll do better next time ;-)
Game 2 - Japanese attack the Siapan bridgehead - US Marines win
The Scenario
Following their initial setback following the invasion of Saipan the Japanese regrouped and launched a counter-attack on the Us bridgehead with the aim of sweeping the Marines into the sea. We played this as a
No Retreat scenario.
The Japanese fielded a large for of
confident trained infantry, supported by tanks and artillery. Facing them was a smaller force of Marines with some armour (Stuarts) and pack 75mm guns. In this scenario the attacker wins of they capture one of the victory objectives and the defender if there are no attackers in their half after 6 turns.
 |
| Marines main position |
 |
| Japanese deployment |
 |
| Japanese-eye view |
 |
| Marines-eye view |
The Marines deployed with their infantry platoons holding the objectives and the Stuart's in ambush. the Japanese had little choice but wall-to-wall, but focused their armour on the centre and Marines' left.
The Battle
The battle opened with the Japanese armour advancing on the Marine's left which quickly triggered the ambush and led to the destruction of two Japanese light tanks. These tanks then pressed forward to maul some Japanese infantry. Meanwhile on the Marine's centre and right the Japanese infantry tsunami pressed forward.
 |
| Marine's ambush is sprung |
 |
| The Japanese advance |
 |
| The Stuart's maul some infatry |
In the second phase of the battle the Japanese centre and left pressed forward, applying pressure on the platoon guarding the Marine's right. Initially the Marines did well severely damaging the leading Japanese platoon with BAR and artillery fire. However numbers told and the Marines were eventually pushed back on their objectives by a series of armoured assaults. Things were looking grave for the Marines with only a few teams now holding the objective and the Japanese poised.
 |
| The relentless advance |
 |
| Japanese armour closes in |
At this critical point the US armour intervened and with assistance from some Marine AT units was able to destroy the Japanese armour.
 |
| Chi Ha's break through |
 |
| Stuart's take the Chi Ha's up the bunty |
Their blood-up the Japanese infantry launched desperate assault on the Marines and the dreaded Nikuhaku teams destroyed two Stuarts before being killed. With the Japanese now spent we agreed on a US Marines victory, but a close run thing.
 |
| Japanese infantry assault |
 |
| Nikuhaku leave destruction in their wake |
The Conclusions
A very enjoyable game that went right to the wire, with only the timely intervention of the Stuart's saving the day for the Marines.
Game 3 - US Marines attack the Japanese bridgehead at Saipan - Marines win
The Scenario
This scenario saw the Japanese pinned-back against the sea and fighting to retain their foothold on Saipan against a US Marines assault. The Japanese fielded a
Fearless Veteran armoured company against a
Fearless Veteran US Marines company with Priority air support. This meant the Marines were somewhat outnumbered as they launched their attack.
The Marines deployment was pretty simple - an infantry platoon opposite each objective with HMGs attached and either AT guns or Stuarts to ward off the Japanese armour.
 |
| Marines left flank - infantry and AT guns |
 |
| Marines right flank - infantry and Stuarts |
The Japanese deployed with their artillery protecting one objective and infantry the other. The armoured HQ deployed well forward to threaten the Marines. This left infantry and armour in reserve.
 |
| Japanese HQ - Chi Ha's and Ha Go's, or maybe the other way around... |
 |
| Dug-in Japanese guard an objective |
 |
| Japanese gun-line guarding an objective |
The Battle
On the Marines right they advanced fairly rapidly to begin laying-down fire on the Japanese infantry. Although hits were plentiful the Japanese proved incredibly hard to kill with typically 0 or 1 team killed per turn for the first 4 turns.
 |
| Dug-in Japanese infantry proving hard to shift |
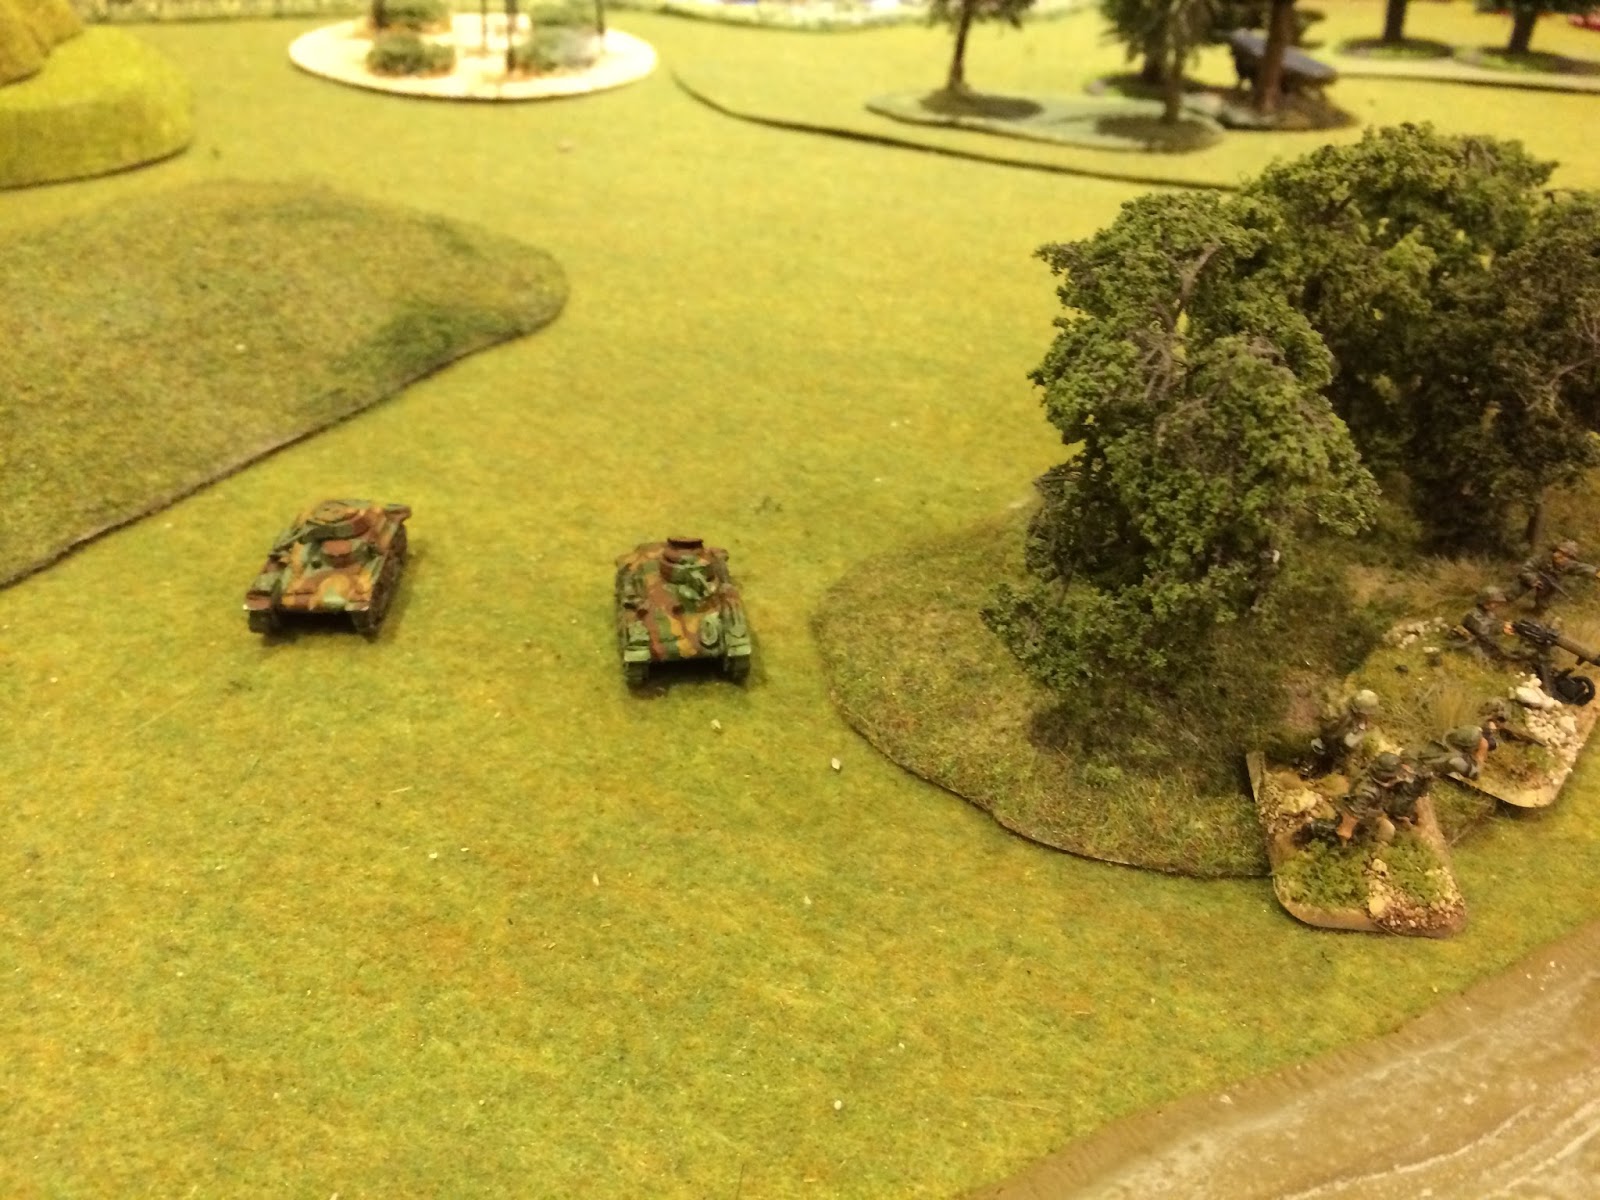
On their left the Marines deployed the AT guns and engaged the Japanese armoured HQ. Honours were fairly even with the AT guns destroyed but most of the tanks brewed-up. This did however tie-down the Marines for a good proportion of the game.
 |
| Japanese armour slugs it out with the Marines AT guns |
The Marines on the right continued to pour fire into the Japanese defenders with limited effect, as the Japanese reserves began to arrive. Japanese armour moved to threaten the Marines right whilst infantry moved up to support the gun line. Over on the Marines left Tankettes supported by the remaining Chi Ha harassed them.
 |
| Stuarts supporting the infantry with MG and Canister fire |
 |
| Japanese armour moves up |
At this stage things looked grim for the Marines with both objectives firmly held and armour threatening their positions. You will note I've not mentioned the air Support, as this turned-out to be fairly hopeless due to poor dice. It was driven-off twice by Japanese naval support and failed to score a single kill when it did arrive. If we had finished at 10pm (6 turns) then the Japanese would have won easily. But we did not....
Turns 7 and 8 saw a sudden and frankly unexpected change of fortunes. The Marines on the left flank launched a limited assault on the Japanese infantry defending the objective. Although a failure it did weaken them allowing the Stuarts to launch a successful attack of their own. This, combined with some accurate AT fire, meant the objective was suddenly within grasp.
The Stuarts surged forward to the objective and the came the critical move of the game. Firstly the Stuarts were able to survive a turn of fire from the Japanese gun-line with only the loss of a single tank. Secondly the Japanese infantry moving to reclaim the objective were pinned in an airstrike and unable to move.
 |
| Stuarts capture the objective |
 |
| The gun-line opens-up |
 |
| The victorious Stuarts |
The Japanese armour did manage a consolation goal as the tankettes moved through the Marines rear and destroyed their mortar battery.
 |
| Tankettes ahoy |
The Conclusion
So an unlikely victory for the US Marines given the position after 6 moves. There were probably three factors in the result.
- Firstly the double assault on the Japanese infantry weakened them enough for the Stuarts to succeed.
- Secondly the Japanese infantry did nt take any Nikuhaku teams, so leaving them vulnerable to tank assault.
- Thirdly the Japanese reserve infantry moved a turn too late to try and retake the objective.


No comments:
Post a Comment