Title

Title
Tally Ho!

Sunday 17 April 2016

Kit-bashing Ancients

The Archers

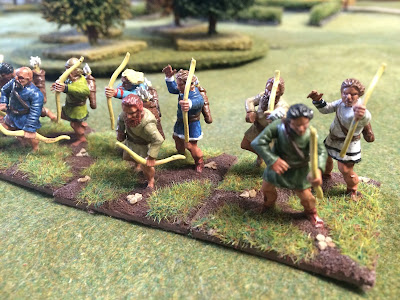
I found myself short of a few units for my Dacians so decide to indulge in what the trendy kids called "kit-bashing" to make up a unit of formed archers.
Dacian Archers
The body of the archers was from Wargames Factory's Numidian light infantry, the sleeved arms from Gripping Beast's Arabs, and the heads from Warlord Games' Celts. So all the main plastic manufactures covered!
Javelinmen
I did want to take time to praise the Wargames Factory Numidian infantry set - surely most versatile plastic set on the market. Sadly they are not currently unavailable following the deal with Warlord Games to begin marketing the range. Hopefully its just a temporary absence as they are slowly repackaging and re-releasing the ranges.

I was lucky enough to buy 3 boxes before they went off sale. For the princely sum of £14 you got 28 fairly generic figures in tunics and a whole host of weapons - spears, javelins, bows, slings, and swords. Plus a clutch of shields and Punic standards.

Archers
The figures were fairly basic modelling-wise but were amazingly versatile.  I've used them for Numidian Archers, Numidian Javelinmen, and Balearic Slingers.

The Dacian / Celtic archers were fairly simple to assemble. I plumped for the Arab archer arms as I wanted a sleeved look rather than bare-armed. The only slight tweak was that Wargames Factory heads have necks and Warlord Games holes. So I knocked-up some necks from sprue and hey-presto.  


Slingers


Saturday 16 April 2016

Chain of Command - Second Game

Due to various absences we've decided to delay the start of the Montrose campaign and see if we can cement our understanding of Chain of Command. So the rest of the month will be dedicated to learning and assessing the rules.

The Scenario

Patrol phase
This week we tried-out The Probe scenario, which featured the Soviets trying to penetrate German patrols in search of the MLR. The Soviets win if  a single team reaches the German base-edge. 
The patrol phase ended with the
Germans positioned in soft cover along the base-edge. The Soviets had two jump-off points in a central position and one on the left flank of the German position in a wood.

The Germans had 3xFallschirmjäger squads, an MG42 MMG, and a 50mm mortar. As the attackers the Soviets had a 3xRifle squads, a maxim MMG, a 50mm mortar, a sniper squad, and an elite scout squad.

The Deployment

The Fallschirmjäger's plan was simplicity itself - they deployed early with one squad covering each jump-off point and the MG42 in the centre. With seven of Hilter's buzz-saws in the line they intended to rely on firepower to see off the Soviets.

The Russians had an equally simple plan - they hoped to use the scouts to force an early deployment, establish a flanking position, and then attack through the heaviest cover in the centre, using the orchard as an attacking platform.

Soviets deploy in the centre

Germans deploy on the right flank

The Battle

The battle opened reasonably well for the Soviets with the scouts pressing forward and the maxim deploying to the flank to begin wearing-down the Germans
Soviet scouts move forward

Maxim and Snipers on the flank
The Soviets then pushed forward with two of their rifle squads, hoping to move though the centre and into an attacking position. As we entered the middle part of the battle the weakness in the Soviet plan became evident.   The scouts and the flanking maxim were able to be defeated in detail and did limited damage to the Germans. It was clear that attacking in column through the middle would simply lead to the Soviet squads being faced with a wall of fire one-by-one.  

Rifle squad follows the scouts
So the Soviets attempted to refocus the attack, moving two squads to their left flank under cover of the farm and trying to establish a base of fire in the centre with a third squad supported by an LMG. 
Two rifle squads move to the flank

Soviets try to establish a base of fire
With Soviet casualties mounting we concluded that they would be unable to make any serious headway against the entrenched Fallschirmjäger. So the game ended with a clear German victory.

The view from the German right
 

 The Verdict 

This scenario really suited the Germans - their superior firepower meant they could mow-down the Russians with minimal damage to themselves.

In hindsight the Soviets made a few mistakes that contributed to their downfall:
1. The flanking base of fire proved ineffectual and isolated. It should either have been placed later so it was nt isolated or placed further back on the hill so it was at long-range for the German LMGs.
2. Attacking in waves did nt really get the best from the Soviet numerical superiority, they were defeated in detail and did nt damage the Germans much.
3. The sniper's focus switched too late to the MG42

The general agreement was that we're enjoying the rules - it really feels like you are a platoon commander and tactics are critical to a good performance.

We have noticed that the terrain placement is critical though. There is a difference between what looks neat and what gives a good set of options for jump-off points. More scattered "lumps" of terrain will likely give a better game than a few large areas.



Sunday 10 April 2016

Fresh from the painting table - Punic Cavalry and Hannibal

I'm nearing the end of my long journey to raise both Roman and Carthaginian forces to refight the Punic wars in 28mm. The latest from the painting table is a unit of Punic heavy cavalry, a Numidian prince and Hannibal himself.

Punic heavy cavalry

Numidian prince

Hannibal Barcas

Front view of Hannibal


All the models are from First Corps, purchased back before Christmas at the Warfare show in Reading. The only slight issue I had was that half the shields had an off concave centre to them. Looking on their website this might be deliberate as many seem to feature this, rather than a moulding fault. It would however have made it impossible to use the transfers I bought, so I filled in the dimples with milliput.

Now all I need to do is some Carthaginian heavy infantry and they are ready to take the field.

Tuesday 5 April 2016

Chain of Command - first game

Image result for chain of command rulesThe week started slightly oddly when one of the club members announced they "had met a man on the Internet". The man turned-out to be Dave from the Penarth Wargames club ( http://www.penarthwargames.co.uk/) who had kindly come along to teach us all Chain of Command.

For those who are interested the authors have a series of YouTube videos explaining the rules here https://www.youtube.com/watch?v=XiT70m6CJO8

The Setup

As this was our first game we went for a very basic scenario - The Patrol. This involves both sides trying to push the other from the table. We had a dense table with a village in one half and fields in the other. 

Some of the jump-off points 
One of the features of CoC is the pre-game Patrol Phase where you manoeuvre a line of four markers that become locked once they come within 12" of the enemies patrol markers. Three of four patrol markers become Jump-off Points from which troops can later deploy. This is a unique idea and means you start the game with an empty battlefield with units joining as battle progresses.

This phase ended with the Germans in possession of the village and the British in the fields beyond.


The Game

The game began well for the Germans with them getting multiple phases of action before the British got a move. They used this to deploy all three of their squads; one in a house and one on each flank attempting to setup fire positions against two of the British Jump-off Points.

Germans advance
The British responded by deploying one of their squads and a light mortar into a wood in the centre of their position. The mortar proved especially useful as it could fairly reliably block the Germans line-of-sight a key moments.
British base of fire
The crucial move of the game was when the British deployed two squads and a senior leader right in front of a German squad trying to dominate a British Jump-off point. Their assault proved devastating as they wiped-out the Germans for the loss of only 2 men.
British reinforcements arrive

The assault goes in
This enabled them to flank the German position and threaten one of their Jump-off Points. This out the Germans in a tight  spot as they tried to redeploy to meet the threat
British flanking movement

Germans respond
We completed the game after about 3 hours of play. The Germans were in a precarious position and would have been forced to withdraw from the field.

The Verdict

By common agreement the rules were a step-up from the Bolt Action games we've tried recently - tactics felt more realistic and there was less coordinated fire possible between the units. The Patrol Phase is also a neat idea and adds an element of randomness to the set-up.

The use of sub-units also adds an element to the game where more realistic fire-and-manoeuvre becomes possible. Early days but we had the sense that real small-squad tactics would be rewarded
 more than the head-long approach for Bolt Action.

On the down-side its not a quick game, though we were assured you get faster as you play more. In hindsight we probably had too much terrain and so it often was nt possible to actually shoot the enemy. For future games we'd want to dial-back on that. 

Finally a big thanks to Dave for the 2-hour round-trip to teach us the game. It looks like the one we'll be adopting for a future Eastern Front game.

Saturday 2 April 2016

Sword and Spear - second game

It being Easter we were on reduced manning this week so decide not to start the Montrose Campaign until we had everyone back. So we thought we'd try a second game of Sword and Spear.

As we've packed-away all the Crusaders we did nt repeat the previous game, but went for a classic encounter - Imperial Romans verses Dacians.  As you will see from the pictures we went to 160mm frontage units e.g. 4 of my standard 40mm bases. The table was 8 feet by 4 feet.

The Setup

Overview of the table with dice and movement sticks

The Romans deployed with their left on a large hill, this had the bulk of the Legionaries. On their right were  the Auxuila, backed by the veterans.  From John's deployment it was clear he was planning a defensive effort an hoping the missile troops would soften up my Dacians

Roman centre

Roman left

Roman right anchored on a hill
The Dacians went for a pretty simple set-up. The centre was occupied by Falxmen backed by Dacian warriors. On the flanks I deployed the most manoeuvrable units; Samaritan cavalry to the right and Dacian Nobles to the left.

Dacian's sir - thousands of um


Decebalus looks confident

The Game  

My plan for the attack was to grind forward in the centre and use my two most manoeuvrable troops on the flanks to try and envelope the. By placing the Discipline level 3 Saramtians and Nobles in groups accompanied by a General  they would be able to move on 2's. The Romans favoured a fairly static defence and hoped to use their greater firepower and resilience to wear-down the barbarian hordes.

Sarmatian assault on the right
The game began with a general advance from the Dacian hordes. On the right the Sarmatians quickly camr to grips with the Romans. This proved a slugging-match as the both had good armour and low discipline. So with good dice both sides were able to stay fairly fresh and go toe-to-toe. In the end the stalemate was only broken when some Dacian horse managed to flank the Romans.   

Dacian right pushes ahead
On the left the Dacians initially made good progress, mashing the weaker Auxilia and creating some big holes in the line.  The Romans reserves stabilised the position somewhat and the Dacians attack stalled on this side.

The action in the centre
In the centre the Dacians found it very heavy going  - Romans uphill with artillery support was near impossible for them to shift. I also made a deployment error by placing my Falxmen (Lacking Protection) in the front rank, this making the Roman artillery more effective.

We finished with the Roman's ahead on points but with their left broken and a large force of hairy Samratians about to gobble-up the flank. So a Dacian victory was likely had be played a little longer.

The Verdict

My opponent really enjoyed the activation system as it enabled constant micro-management of the combat. As a Hearts of Iron fanatic he loves that find of thing!

The combat / activation system is certainly ingenious and does force constant decision making by the players. I guess the issue though is its pretty abstract and does nt seem to reflect "wargames logic" as its not clear what you are really allocating when you make your choices about the dice. So in the end the dice allocation matters much more than tactics or deployments as troops are nt very differentiated from each other and once the main lines clash there is nt much manoeuvre.

I suspect we'll play occasionally though as its a fun game and does give a different feel from most games I've played.