Title

Title
Tally Ho!

Saturday, 10 September 2016

Chain of Command - Stalingrad-ish

In preparation for our upcoming Chain of Command eastern front game, this week we tried out the rules for FIBUA using my Stalingrad terrain. We opted for 2 * 4" tables and made the forces about two-thirds the usual size.

One area  was industrial with some shell-cratered open areas. The other was more residential with narrow streets and rubble. Table 1 pitted Soviets against Finns and Table 2 Soviets against German Fallschirmjäger.

We ruled that you could not see over a single wall, so only troops against a wall were visible to fire, We also treated building interiors as hard cover due to the rubble etc. As we're still learning the rules we timed-out on both games with the Soviets slightly ahead on one and the Finns on the other.

The Residential zone

On this table the Patrol Phase proved pretty even, with both sides deploying in decent cover. The Soviets did most of the manoeuvring but the flank attack by an SMG squad proved a disappointment as they became pinned by the German LMG fire. Heroes of the people this week go to the chaps who hauled a maxim into and upstairs window to rain fire on the Germans.

The Soviet deployment with Germans just visible at the top

The second Soviet squad digs in

The German seize a building - this will be their home for the rest of the game

The German sniper takes up a good position

Soviet SMG squad sneaking-up on the Germans

The Soviets launch an assault

Heroes of the revolution

The Industrial zone

Here the Patrol Phase heavily favoured the Finns, with the Soviets pinned-back onto the table edge and one corner. Again the Soviets made the running advancing boldly and managing to neutralise a Finnish jump-off point in the edge of the factory. They attacked valiantly but lost a squad to focused fire from the Finns (not easy to say!)

 
Soviets capture the water works - I think that's worth £200

Inside the large factory

Ruined factory with the waterworks behind

Soviet snipers find a hide

Soviets and Finns square-off 

View down the road - not much cover their gov


Sunday, 4 September 2016

First Battle of Newbury, 1643 - Part II

You will remember from last week's Blog that at the half-way point things were fairly even overall. Rupert's Horse was making good progress in the south, but the centre was firmly going Essex's way. Honours were pretty even in the fields to the north. Tune in next week for the conclusion.

The Northern section

In the Northern section of the field the Royalists pressed forward with both Foot and Horse in an attempt to force the flank of the Round Hill. The attack met with an initial set-back when the lead unit of Foot was routed and the Parliamentary Horse surged forward into the stationary Royalist cavalry.

Royalists advance into the teeth of the defence

View from the Royalist lines

The attack stalls as the roundheads counter attack
All this came to a shuddering halt though as the roundheads came up against a very lucky streak from the Royalists. They saved all the hits against them  and so threw-back the Parliamentary Horse, reversing all their gains and threatening to turn the flank. 

Luckiest men alive
Essex deployed most of his reserves to stabilise the position. the fresh Foot proved up the task and the battle quickly became a stalemate.
Fortunes reversed 

The action bogs-down

The Centre Section

In the centre the action began with The King throwing his reserves into the assault on Round Hill. They advanced boldly but were unable to make any dent in the defences around Round Hill.

Reinforcements for the Royalist cause

The attacks goes in 

The attack waivers

The Southern Section

Both sides received fresh squadrons from their reserves but Rupert's previous success saw him start with the upper-hand. He attacked boldly but the roundheads were able to rally some of their fleeing units and although at a disadvantage mount some sort of defence. 

Roundheads return to the fray

Rupert fights his way forward
This was in truth just a delaying action though, as Essex knew his tired troopers would not be able to hold Rupert for long. He used the time wisely to deploy a defensive line that refused his flank. 

Essex forms a solid defence

The Verdict

The game ended with the Royalists having taken valuable ground, but now lacking the strength to mount a serious assault on Essex's lines. Round Hill was secure and indeed had never been seriously threatened during the battle. Its guns were also intact following some very poor counter battery fire from the Royalist gunners. This proved decisive in holding back the Royalist tide.

So somewhat similar to history, which is not a bad result. It was also enjoyable to see almost all the clubs collection of ECW taking to the field at once. An inspiring sight, and we'll certainly undertake another ECW campaign soon, perhaps northern England so we can deploy the Scots again.

Saturday, 27 August 2016

First Battle of Newbury, 1643 - Part I

Following the completion of our recent Montrose campaign we deiced to tackle a larger battle over a couple of evenings, so we could use almost all of the figures we had available - my troops as the Parliamentarian's and Stuart the Elder's as the Royalists. So I settled on First Battle of Newbury as the right size and with some local interest.

The History Bit
Picture reproduced from the BCW Project

 First Newbury occurred in September 1643 and pitted Essex against the King. The Royalist forces had attempted to besiege Gloucester but were forced to withdraw when a Parliamentary army under Essex marched from London to relieve the defenders. Although denied Gloucester the Royalists realised that a decisive defeat of Essex would leave London virtually defenceless, so they resolved to bring him to battle. A game of cat-and-mouse ensued, including a cavalry action in Cirencester (perhaps the last real excitement the town has seen), culminating in the Royalists getting ahead of Essex and forcing him to fight to secure his route back to London.

The Scenario

The battlefield of Newbury was dominated by three main features. To the north was an area of lanes and fields representing a closed area unsuitable for cavalry action. To the south was Wash Common, a large open area of high ground. Finally in the centre was Round Hill, a strong defensive position with good fields for fire for artillery. Rupert's cavalry scouted the field before the battle but somehow missed Round Hill and so this was occupied by Essex and proved to be one of the key objectives for both sides during the coming battle.

Royalist Forces
  • The King - CinC
  • Left Wing - Prince Rupert; 6 Horse (2 vet)
  • Right Wing - Byron (4 Foot)
  • Centre - Belasyse / King (2 Horse, 6 Foot)
  • Reinforcements (2 Horse, 3 Foot)
Parliamentary Forces
  • Essex - CinC
  • Left Wing - Middleton (2 Horse, 2 Dragoon)
  • Right Wing - Stapleton (6 Horse)
  • Centre - Skippon  / Essex (8 Foot)
Troops defending Round Hill were given soft cover and the artillery overhead fire ranges shortened to 4" as we only had a 4' deep table. Rupert's lifeguards were rated Veterans as are the London Trained Bands.  

The Battle - Part I

In the southern part of the battlefield the action began with a general advance by both sides Horse onto Wash Common. The Parliamentary cavalry were the first to crest the rise and so charged (well trotted) headlong into Rupert's troopers.
 
Parliamentary Horse on the attack

The view from Rupert's side
Initially things seemed to go well for Stapleton as he was able to push back one of Rupert's regiments and halt the other in its tracks. Seeing this Stapleton took the decision to pull back his reserves in the hopes of keeping them fresh for later in the battle. Rupert's plan was different as he committed his Lifeguards to stabilise the position.
 
Stapleton pushes forward

Rupert commits the Lifeguards
Inevitably the Royalists greater numbers told and they were able to push-back the Parliamentary mounted. What would prove more useful the initial victory or the fresh reserves ?
 
The combat ebbs in Rupert's favour
In the north there as an initial advance by the Parliamentary Dragoons as they sought to exploit the cover to begin sniping at the Royalist foot deployed in the open beyond the fields. Given their swifter movement the Dragoons established a good position  amongst the lane's and hedges, from which they began to ware-down the Royalist foot.
 
Deployment in the fields
The Royalist quickly grasped that they could not win the firefight, so advanced as rapidly as they could to close with the enemy. This was costly as the Dragoon's fire was able to force-back two units of enemy foot.

The Royalist advance
 However one regiment was able to make contact and quickly routed the pesky Dragoons before securing their ground.
The charge goes in
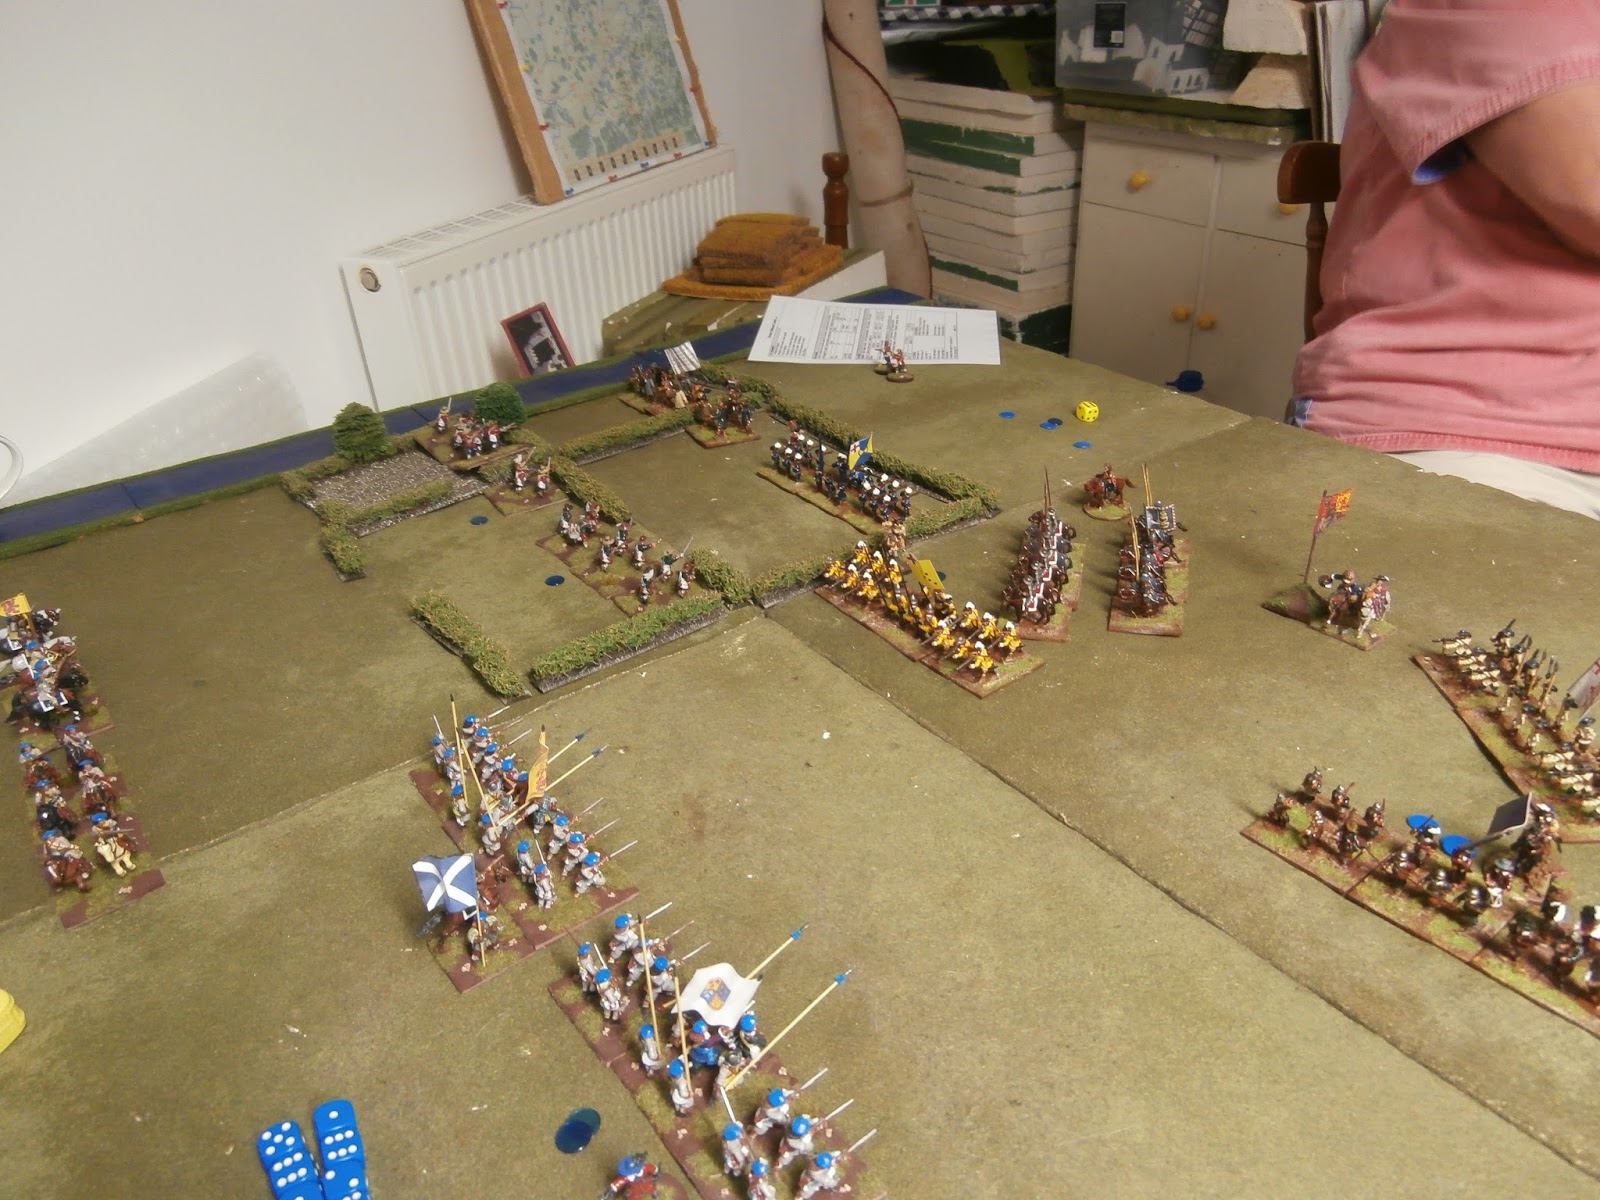
Meanwhile both sides were manoeuvring their Horse and Foot to support the assault on Round Hill. The evening ended with  honours pretty even in the northern section of the battlefield.
Success!
 
So finally we look to the centre of the field and the battle for Round Hill. This was stoutly defended by a brigade of Foot and three artillery batteries. Some excellent shooting from the Parliamentary foot meant that Round Hill was not seriously threatened in this first part of the game.  Indeed the defenders shooting was so effective that the Royalists lost an entire brigade with only limited damage done in return.
 
Mind the gap - a Royalist brigade has been routed on the left of the picture
 
The doughty defenders
So at the half-way point things were fairly even overall. Rupert's Horse was making good progress in the south, but the centre was firmly going Essex's way. Honours were pretty even in the fields to the north. Tune in next week for the conclusion.   


Saturday, 20 August 2016

Montrose camapign - week 11

Battle of Ross and Cromarty - Montrose Wins

After a short break over the summer we resumed the Montrose ECW campaign. Following a recent run of success Montrose was now well ahead with Scotland very close to falling entirely to the Royalist forces. This would therefore be the final battle of the campaign should Montrose win.

The Scenario

Once again this was straightforward pitched battle with both sides seeking to inflict maximum damage on their opponents - the winner being the first to rout 50% of the enemy. The victory markers in the village each counted as 1 routed unit.

Covenanter Forces8* Foot (1 * Vets)
1 * Field artillery
5 * Horse (2.5 regts)
1 * Forlorn Hope (Vets)

Montrose Forces
3 * Vet Foot (Irish)
5 * Gordon Foot (3 Raw)
3 * Highlanders
1 * Field artillery
4 * Horse (2 regts)
1 * Light gun

The Battle

The two sides adopted slightly different plans on this occasion. The Covenanters launched a general assault on their right and centre but refused their left as they found their cavalry facing foot. Montrose went for something closer to the Bulls Horns with Horse attacking on the left and Highlanders and Gordon foot on the right,
Stuart the Elder points-out his attacking foot. Montrose horse in the distance

Lowlanders and highlanders attack
On Montrose right his Raw lowland foot made good progress against the Covenanter horse but the highlanders were repulsed by the Veteran Forlorn Hope holding the village. In the centre the Covenanter foot advanced steadily in two lines - this looked a strong position as Irish Brigade was thinly spread with no reserves. The Wargames gods are fickle though, and for the second battle in a row the Irish Brigades shooting was deadly, quickly destroying the first rank of attackers.

Highlanders make slow progress in the village

Covenanter foot under heavy fire

Over on Montrose left the Horse made good progress against their outnumbered opponents and were able to push them  back, threatening the flank of the Covenanters. In the centre the slaughter continued with the Irish brigade routing several units of the enemy foot for little apparent damage.

Montrose Horse dominates the field

Still no progress for the Highlanders

Covenanter foot quits the field
In a slightly bizarre, but understandable, mix-up the Covenanter lancers on their left launched an unsupported frontal charge on the Gordon Foot. It turned-out the blue bonnets had led them to believe they were Highlanders. Needless to say it did not go well for the Horse. 

Opps
With the centre crumbling, and the flanks in trouble, we reached the point where 50% of the Covenanters had routed. So a third straight win for Montrose.
View of the field

The Verdict

This victory meant that Montrose had taken a decisive lead and was 9-5 ahead in territories held. By common agreement we felt that Scotland had fallen to the Royalists and so in  June 1645 the Covenanters sued for peace.
So all-in-all a strong showing for Montrose and it was nice to play a campaign through to conclusion over a period of about 4 months. Some reflections from my perspective:

1. The games looked great and with the addition of Stuart the Elders troops we were able to field some large armies which added to the spectacle.

2. Our various tweaks to the rules worked pretty well, with large battles (15'ish units a side) fought to conclusion within 3 hours every week.

3. The simple campaign system provided some benefits to winning but obviously limited strategic scope. With both sides attacking and perhaps the territory rewards known in advance this aspect could have been enhanced.

4. Creating overlaps was the key to success as this enabled you to rapidly create unsustainable damage on the enemy. Montrose seemed to manage this more often than the Covenanters. Cavalry combats were too slow and bloody though, so in-effect they cancelled each other out and even the winners were unable to take any further part in the game.  
       

Wednesday, 17 August 2016

Battle of Khota Baru 1941 - a Flames of War game


Bachok Beach.jpg
One of the Japanese landing beaches
Recently Roy hosted a game of Flames of War for the club, with the game based on the Japanese seaborne invasion at Khota Baru in Malaya. This was one of the first actions of the campaign and historically ended in a Japanese victory after some fierce fighting.   

The Scenario

The historic battle was a large affair so it was refought as a scaled-down action. The Japanese were required to capture one of two objectives near the vital  railway-line.

The Battle

The British defensive line with the gaps between the dense jungle covered by bared-wire. The Brits defended forward and shot down most of the Japanese force on the beach. On both flanks the Japanese eventually occupied terrain, but it was an expensive advance and the British line was only just turned.
 
British defensive lines

 
Japanese advance into cover

 
The Japanese light tanks break through to the coast road , turning the British first line, but with their infantry spent there is little likelihood of the tanks reaching the railway and the objectives.


Japanese armour advances, but alas in vein
The British commander chose to deploy a platoon of 40mm AA, keeping his Lanchester armoured. cars and two sections of Bren carriers in reserve . With a gun line of eight 25 pdrs and more platoons to come the Japanese did not have enough to support their toy tanks.

British artillery and AA
 
So history was reversed with the British scoring a notable victory. Post-match analysis was that the Japanese attacked too piece-meal and lacked the decisive punch to overcome the British defences.


Saturday, 6 August 2016

28mm Carthaginian Infantry - all completed

My intermittent progress towards fielding a decent sized Punic force has taken a step forward with the completion of the last of the infantry. Two boxes of Victrix Warriors of Carthage have yielded two units each of Veterans, Citizens, and Libyan Javelinmen.

In my view this is one of Victrix best sets so far and the Veterans certainly look the part.


Battle array


Battle array from the other side

All six units

Close-up of the citizerns 

Veterans holding the high ground

The heavies ready for battle