Title

Title
Tally Ho!

Tuesday 27 August 2019

The Big Red One - a project completed

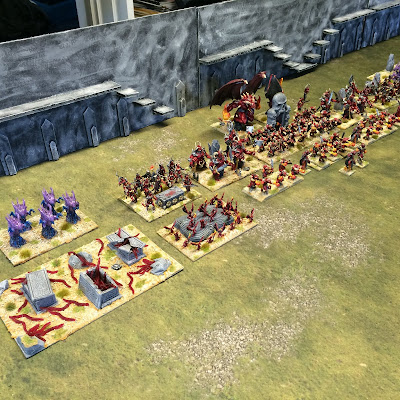
After some months of painting (mostly reds) I've now completed by Forces of the Abyss army. I've played several games against it but have yet to command them. They have lots of tools with fast units, hard hitting units, some big infantry blocks and a good range of heroes and monsters. I'd planned about 2000 point but I think its well over 4000 now.

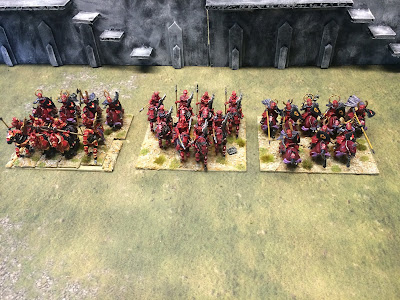
First up is half the core infantry - Lower Abyssals, Larvae, and some cheeky Imps. These units are designed to hold ground and bog-down the enemy


Imps

Lower Abyssal

Larvae

The other half of the core infantry - Succubi, Flame bearers and Efreets. These bring melee punch and distance shooting respectively.


Flame Bearers

Succubi

Efreets

Next up are the heavy hitters, large demons to break the enemy lines. Here were have Despoilers flanked by Molochs.


Despoilers

Molochs

Every army needs some spend and punch. For the Abyssals its the Abyssal Horsemen and the Hellequins. These three units could be used as either.


Hellequins

Abyssal Horse / Hellequins

The final set of major units are fast-moving troops designed to interfere with the enemy plans or guard the flanks.  Here we have Hellhounds and Tortured Souls. These are mostly purple as I needed a break from red and black!


Tortured Souls

Hellhounds

Finally we have the various heroes and individuals who complete the army.


From left to right a Demon lord / Arch Fiend, Ba'Su'su the vile and the Seductress enchantress.


Another Arch Fiend, very much the centre-piece of the army.


Again from left to right - a warlock, Helllquin Bloodmasque, a Champion, and a standard bearer.


So there you have it an awful lot of red paint.


Sunday 25 August 2019

Triple wammy of games

This weekend being a bank holiday I had more time than usual and got in three games - two Kings of War and a Vanguard. So lots of piccies

Vanguard Skirmish 


The demonic Forces of the Abyss took on the beastly Herd contesting a Pillage-style scenario with three objectives to capture. This ended a 1-0 win for The Herd due to my traditional inability to finish-off enemies when they are knocked to the ground.  The Abyssal Seductress hero proved very powerful though.


Tale of Two Forts Campaign


The second game was the forth instalment of the ongoing Fishponds KOW campaign between the Salamanders (Lizardmen) and The Herd. This was also Pillage, with 5 objectives up for grabs. As usual with the slow-moving Salamanders I looked to attack with my Ancients on one flank (the right) and refused the other (the left) with this being held by a Greater Fire Elemental, some Tyrants and Blizzard Lizard. The Herd focused most of their troops opposite me with a fast force of Eagles and Chariots against my refused left.      


In the early turns my Blizzard Lizard cleared the Eagles on my left and gave me the chance of a bonus objective I was nt originally planning to content. More centrally though the charge / counter-charge did nt favour me, with the crucial Ancients of Rinosaurs not having the impact needed, leaving my right badly weakened.  


Some fun was had on the left as a I scooped-up the objective and then managed to Surge my Greater Fire Elemental into the flank of The Herd line. After couple of moves I made decent progress in the centre but all too slow to push for a win as the right had collapsed.  


The game ended with 1 objective to the Salamanders, 2 contested and 2 to The Herd. so a 2-1 loss which means the Lizardmen are pushed back to their fort for the final game.


Boarder Skirmish Campaign


The final battle was the third of the Salamanders vs Forces of the Abyss. The scenario was Invade, so points are scored for units over the half-way line. Both sides deployed with their strongest units opposite each other (the lizardmen left).  


The Salamanders sat back initially looking to rely on their shooting before looking to counter-punch against the advancing Abyssals. With both sides largely static on the Salamander right the Abyssals attacked with their Molochs, who were held-up by the Lekelidons before being counter charged and routed by the Ancients on Rinosaurs.  


Centrally the infantry lines clashed and the resilient Salamanders were eventually able to win the grind against the more lightly equipped Abyssals.


Go a solid win for the Lizardmen in this one, ending the weekend on a win. I must admit though to some distraction as the game overlapped with the end of Stokes innings at Headingly.

Image result for ben stokes TMS


Sunday 18 August 2019

Musket and Tomahawks

We took a quick break from Napoleonic's this week to try out the Muskets and Tomahawks rules. We wanted to understand them a little before committing to a campaign.

The rules are card driven with all units of a type on a side (Regular, Irregular, Indian Provincial, and Militia) activating at once. Activation is usually move, shoot, reload, or charge/fight.  The twist number of activations and activations per card varies by type. For example Regulars have 2 cards each with 2 activations where as Irregulars have 4 cards each with one. Militia I think had a single card with 2 activations. So flexibility / capability are built in by the cards.

Melee and  shooting are pretty deadly with a high change of dying if you are hit. Its semi skirmish with units of 4 - 8 figures and officers moving individually.

British lines 

For this game we pitted French vs British fighting over a farm. The French regulars surged forward to take the farm but moving early on both their cards became pinned down in the first tuern and never really recovered.    

French lines

The supporting Compagnie de Marines routed the British lights and also shot-up some militia pretty badly. They second company than captured the barn and traded fire with the Provincials.


The final action was a charge by the French Indian allies which routed Roger's Rangers and then sent them crashing into the Provincials. This later action was one of mutual annihilation leaving the French in charge of the farm.  

Indians vs Rangers


The game was certainly fast and furious. Every one moves every turn  but the semi-random order means care must be taken not to get isolated and be at the enemies mercy. I can see keeping track of the being a useful skill


Image result for card counting

Friday 16 August 2019

Key Points 1813 - Game 5 of the M&M campaign

Battle 5 was the last of the second round and saw us back at the central crossroads that had been drawn in round 1. Having lost the first 2 games of round 2, the pressure was on the Allies to score a victory.

The aim as before was to control 2 out of 3 objectives; a hill, the crossroads and a farm. Both sides went for a fairly balanced deployment with cavalry on both flanks. In both cases they enjoyed a slight numercial advantage on their own right. 

view from the French left

View of the Allied centre/left
The opening action was on the French right where the Allies launched a strong cavalry attack seeking to exploit their numerical advantage. On the French's own right the attack was more cautious as they pushed forward to capture the farm.


The French cavalry on the Allied right performed better than we might have expected and largely nullified the attack. Both sides fought themselves to a bit of standstill but it did mean the Allies could not sweep around the French left as they had hoped.

On the French right Allied infantry captured the farm but were quickly ejected by superior French forces. Centrally both sides settled into a long-range fire fight as neither felt able to assault the other given the cover available.


The action somewhat petered-out on the French left as both sides sat behind the hill. The Allies were deprived of their expected Calvary advantage and seemed reluctant to commit to an infantry attack that may prove bloody as they would come in close range of the waiting French guns


The main action was on the French right - having secured the farm they made their own move and attacked the Allied cavalry in strength. This was successful in forcing back the Allied horse and routing several units of infantry threatening the farm.


The game ended with both sides in a good position on their own right but on the defensive on their left. The centre was contested and fairly even. We decided on a draw as it was clear that a victory for either side was unlikely to affect the campaign given the outcome of the other battles.


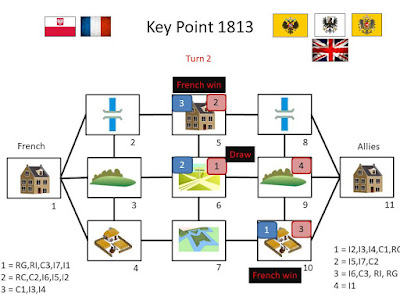
Campaign position

The turn ended with the French on the attack on the flanks of the map but held-up in the centre. Their success at the southern farm means that in turn 3 they can attack the Allied supply base and end the campaign. So this will next game we fight.