Title

Title
Tally Ho!

Saturday 28 November 2015

Waterloo weekend

This weekend Roy hosted the last of a series of Waterloo games in 20mm. A full report will follow on http://hintonhunt.blogspot.co.uk/

This time I played Wellington, my first time on the British side in all our various games. I wanted  to pay tribute to the Unit of the Week - the British rocket battery.


They may be unassuming but they accounted for 2 artillery batteries, 2 cavalry regiments, and an infantry battalion. I'm pleased to say most of the casualties were even French, with only a single battery on the British side falling victim to them !

Heroes of the day
There was some suspicion amongst the French that perhaps the British had some help from a friend with access to improved technology such was there devastating effect

British rockets prove oddly effective

Wednesday 25 November 2015

The Defile - After Action Report

The Scenario

Having completed our various Waterloo scenarios we played a game of Muskets and Marshalls  from C S Grants much-loved Scenarios for Wargamers. I choose one I'd not done before - The Defile / 300.

The scenario features a French attacking force of 6*Battalions and 3*Cavalry regiments against a British force about half the strength. As a twist not at all stolen from history there is a goat-track through the otherwise in accessible mountains that enable the attackers to outflank the defile.

The Battle

As this was a scratch-battle I neglected to take any pictures so instead it will be dispatches from the front...

The battle opened with a French attack in columns across the line, supported on the right by a Dragoon regiment. The British artillery caused some damage to the Swiss battalions forming the French left but the line advanced boldly.

The French then launched an all-out attack on the British line. For once the British shooting was poor and most of the attackers were able to smash into the defending line. Heavily outnumbered the British line resisted for a couple of moves but then buckled.
Around this time the outflanking force arrived. In the end it had little effect as the routing of the main line of resistance effectively ended the battle.

Reflections

The key moment was the decision of the British to stay in line and try to shoot away the attacking French infantry / cavalry on the right. Poor shooting meant we could nt tell if this was viable. An alternative might have been to form square and so dissuade the Dragoons from charging, then rely on the guns to keep the French columns at bay. 
  
On the rules we had an unusual position of a combined attack and so pondered what combat outcome modifiers to apply. In the end we decided not to apply both Infantry in column vs line and cavalry vs line as they felt like they were rewarding the same thing. 

Sunday 22 November 2015

Plancenoite - After Action Report

The Scenario

This scenario featured a large, but low quality, Prussian force attacking the French Guards. We tweaked history slightly to allow Napoleon to allocate some Old guard in support of the Young's. A forgivable change and it did mean we got to see the old boys in action for once. 

Plancenoite scenario

The Battle

The French stood ready with the Young Guard on their left defending a ridge and the Old Guard occupying Plancenoite and the famous church. Skirmishers were thrown forward and a small reserve was in place.


The Young Guard


The Old Guard
A large Prussian force opposed them, comprising pretty-much every suitable figure we had. Some Dutch-Belgium's were fielded as Reserve units in British-supplied uniforms.


The Prussian left 


The Prussian right
The Prussians deployed with their low-quality Reserve units to the front and their better Line or Old regiments in the rear.  Mindful of how tough A+ troops are to evict from cover the Prussians planned an attritional approach using their larger numbers in a shooting war.

The French left
On their left the French stood-too and engaged the Prussians in a fire-fight On their right though the French guards unexpectedly went on the offensive and pushed forward from the town


The Guard attacks

Initial success for the Guard

Initially the Guards bold gamble was a success as they pushed-back the Prussian Reserve units. As the night progressed though they became slowly weakened and in the end one unit as disordered an on the verge of breaking
 
The Guards under pressure
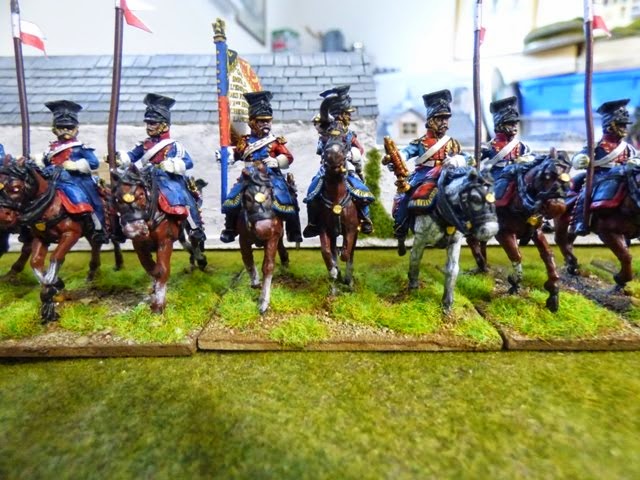
On their left the French cavalry has the better of the melee but by the time they had defeated their enemy  the Young Guard was severely depleted and on the verge of defeat. Even the appearance of the Cuirassiers on their flank was unlikely to hold the Prussians

Cavalry clash


The French have the better of the day
 We halted after about 8 turns but by then the French were struggling. The Old Guard was largely a spent force and Plancenoite was flanked. On the right the Young Guard was struggling. The French could likely hold village as cover is tough to assault but it was surrounded.

Reflections

This was in fact the second time we played the scenario. In the first the Prussians launched a head-long attack with their best troops against the town and the ridge. The result was a rapid defeat as the Prussians simply bounced-off the town and streamed to the rear.

In our second attempt the Prussians were to rely on shooting instead as although the cover helps A+ die as easily as anyone else and eventually a fire might start that drive them out. The action was also heavily influenced by Lobau's decision to attack with the Guard.

It later emerged that an especially dull series of FOW games played over the weekend left him with a blood lust and a desire to close with the enemy in a way he'd been unable to with his early war German cavalry. As in real life its often about the psychology of the commanders can determine the outcome. Clearly the French had been on the receiving end of some Grow Mindset teaching - you can nt route the whole Prussian army.....yet!

The only point of debate on the rules was how to handle a unit forced to retreat through another. The unit interpenetrated suffered no penalty much to the chagrin of the Guards. We discussed perhaps B and C class troops being DISORDERED in such a situation.  

Sunday 15 November 2015

Montrose Irish completed

After a short break to paint Le Haye Sainte I'm managed to complete the final regiment for my Montrose Irish Brigade. So I now have a core force of three regiments for my Scottish royalist army. 
 
Montrose Irish


The flag in close-up
The final part of the force to complete is the three regiments of highlanders. So that's about 40 odd tartan-clad nutters to do.  I have a cunning plan though as I've just bought some new (stronger) glasses. I will paint them with the new glasses but look at them with the old ones! 

Saturday 7 November 2015

Waterloo, Ney's attack - After Action Report

Scenario

This scenario modelled the French massed cavalry attack and the later Guards attack. Partly we wanted to get all the cavalry we owned onto the table and partly we thought it would be a good test of the Muskets and Marshalls rules in a slightly unusual scenario. The latest version of the M&M rules are at the Hinton Hunt blog.
http://hintonhunt.blogspot.co.uk/p/muskets-marshals.html


Ney's attack scenario
Under the scenario rules the cavalry were compelled to attack but the infantry could not move for 6 turns, or until a 6 is rolled.

Battle Report

This was clearly an usual battle pitting mostly mounted against infantry defending a crest.
We managed to field 9 regiments of 28mm cavalry - pretty impressive looking


Massed French horse

Cavalry close-up

The French left 
  The British formed a famous thin-red-line along the crest, although the Germans were green..

The Germans


The Guard

British line
As per the scenario the French attacked boldly all along the front, with 7 of the 9 regiments crashing headlong into the British squares 


Allied left


Allied right


Close-up of the British centre

The lights attack
Clearly the whole crux of the battle was how well the French would fair against the British squares. Five of the seven attacked were able to repulse the cavalry attacks after a round or two of melee. Two succumbed though; one German and shockingly one Guards.


The squares under attack
With the line penetrated at two points French reinforcements were able to pour-in behind the squares.

The line is breached
With two Allied units routing and the French Guards not yet in the action we concluded that the Allies were going to loose and so shook hands at that point.

Reflections

It was an odd scenario using the cavalry to assault the squares rather than pinning them for artillery / infantry attack. Most of the attacks were dismal failures with 50%+ casualties for very little impact on the squares. The British Guards were hit by two units of elite French heavies and with some good rolling Roy was able to win. I attacked a German square with some elite light cavalry and again with good rolling was able to win.

Given the troops quality and excellent rolling we did nt feel it was a problem. Unusual yes, but unacceptable no.

Some additional rules occurred to us as we got lots of practise with squares:

1. Squares beaten by cavalry should NOT rout if beaten but should instead fall back.
2. Squares pushed-back in combat should revert to column.

We did wonder (but did nt implement) a +1 morale for being in square. We mused that once in square fleeing was less likely and you might enjoy increased morale from being closed-packed