Title

Title
Tally Ho!

Saturday 25 June 2016

Montrose Campaign - week 7

Lanarkshire October 1644 - Draw

Scenario

This weeks battle was an encounter game in which both sides marched on to the table and then deployed to capture some key terrain points as well as engaging the enemy. In this case the crossroads and a village were the objectives. Cavalry must enter the table first and no field artillery is allowed as they are slogging along at the back of the column.

Covenanter Forces
9* Foot (2 * Vets)
1* Highlanders
4 * Horse (2 regts)

Montrose Forces
3 * Vet Foot (Irish)
3 * Gordon Foot
2 * Highlanders
5 * Horse (2 regts)
1 * Light gun
1 * Forlorn Hope


The Battle

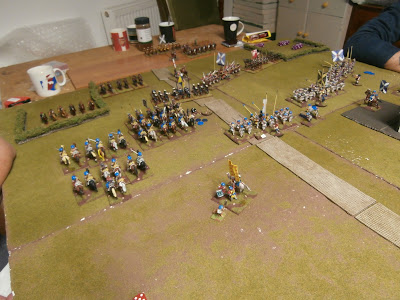
Both sides adopted a fairly conventional approach and advanced on the table with their Horse to the front and attacked the open area to Montrose left. The Royalist Forlorn Hope quickly grabbed the village on the centre-right of their position. As the infantry columns toiled onto the table the cavalry battle was joined.

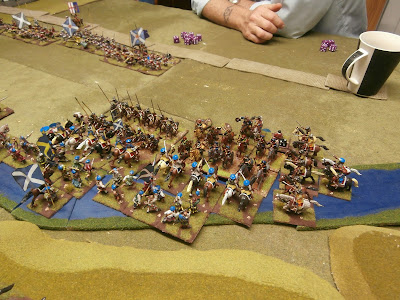
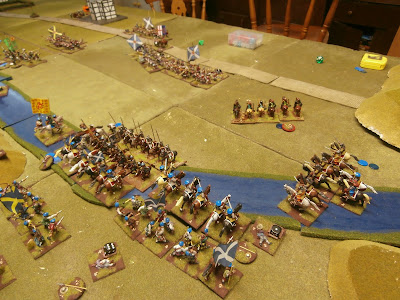
Despite being slightly outnumbered the Covenanters Horse had the better of the early exchanges and began to push forward. However as often happens in cavalry melees things swung backwards and forwards until eventually both sides largely nullified each-other. Whilst this was occurring the opposing infantry forces deployed and made ready for battle.


Mass cavalry melee in the centre and left of the Montrose position


Infantry deploy

Once the Horse had cleared the battlefield both sides Foot came to grips. On this occasion Montrose held back and forced the Covenanters to approach them through a slightly constricted position. Having dispatched some pesky Highlanders the Covenanters found it harder going as they were flanked by Montrose Foot. Blows were traded fairly evenly despite the Covenanters having a slightly poorer position.

Covenanters left advances

Covenanters centre faces the Irish Brigade
With a draw looking likely both sides enjoyed a last hurrah by launching a cavalry attack. The Covenanters Trotters charged into a fresh unit of Gordon's Foot but were halted by the steady pikes. Montrose had more success as he managed to catch a column of enemy Foot deployed in march column.

Covenanter Horse attack and are held
Caught in column - nasty!
The battle ended with darkness drawing-in and neither side able to force a victory, so a Draw was agreed.
A dog-leg, more ACW than ECW?


Campaign Situation

As the battle was drawn there is no change in the overall situation.

Wednesday 15 June 2016

Montrose Campaign - week 6

Angus September 1644 - Montrose win

Scenario

This weeks battle  required a little more movement than some and is inspired by Grants reinforcements off-table scenario. For this battle the Covenanters started with 25% of their troops garrisoning a fortified church complex and 50% of their forces trying to breakthrough. Montrose was free to split his troops between assaulting the defences and holding off the relief force as he saw fit. The winner was the one holding the church at the end.

Covenanter Forces - garrison
3 * Foot regiments
1 * Field gun

Covenanter Forces - relief column
4 * Horse (2 regts)
3* Foot regts

Montrose Forces
3 * Veteran Foot (Irish)
3 * Gordon Foot
2 * Highlanders
4 * Horse (2 regts)
2 * Field gun
1 * Light gun
1 * Forlorn Hope

The Battle

Montrose deployed with his best assault troops facing the church supported by the Field guns. The Highlanders deployed opposite the side of the church with the Irish Brigade facing the more challenging front. On the other side the Forlorn Hope was poised to attack. This week Montrose decided to play The Brewery territory card - this gives a unit  +1 in combat and morale, but you must advance at and attack the enemy along with the accompanying beer wagon.

Facing the relief column was the Horse and the weaker Gordon's Foot with the support of a Light gun.  


The Irish Brigade ready to attack, Highlanders in the distance

The blocking force waits the relief column 

Close-up of the Highlanders, complete with beer wagon

The Covenanter garrison

On Montrose left the Covenanter relief column arrived and pressed forward with the Horse in the lead. In a reversal of recent battles it was Montrose Horse that had the upper hand, destroying the leading Covenanter squadron and pushing back the remaining Horse. Combining well with the Gordon Foot they were able to pin the relief force back, who were hampered by the fields on their flanks.

Covenanter relief column advances 

Battle is joined - Montrose Horse doing well for a change 
Over at the church Montrose began the battle with an ineffective bombardment against the defences before beginning his advance against the garrison. On the right side of the church the somewhat intoxicated Highlanders advanced quickly and with a 2-1 advantage were able to force their way across the defences. On the left side of the church the Irish Brigade advanced and commenced a fire-fight against the defenders. Despite the cover the garrison lost a regiment of Foot fairly quickly as 3 of Montrose foot focused their fire. After a brief struggle the garrison was routed and the church complex captured for Montrose. 


Stuart the Elder demonstrates a rare left-handed Wargames point

The Highlanders breach the walls

Relief force bottled-up

The church just before it falls

The relief force struggles


 Campaign Situation

This was a forth win for Montrose putting him 6-4 ahead on territories controlled.

We agreed that we would make a few tweaks if this scenario is played again:
1. We would allow shuffles sideways inside the defences
2. We would allow the whole of the defenders forces to fight (75% vs 50% in the relief column
3. We would start with the relief column a bit closer


Sunday 12 June 2016

Flames of War Pacific campaign

 
For a change of pace a few of us are now playing an occasional Flames of War campaign featuring island-hopping in the Pacific during WWII. To avoid confusion I've created a separate page for this containing both the campaign rules and the battle reports which can be found here:

flames-of-war-campaigns

To wet your appetite here are some pictures of the opening game featuring a US Marines assault on a Japanese held island.

The Japanese defences

Marines storm ashore Ooh Rah

Marines capture the victory objective


Saturday 11 June 2016

Montrose Campaign - week 5

Perthshire Aug 1644 - Covenanters win


Scenario

A fairly straightforward affair this week as the scenario generator produced a Pitched Battle. Both sides clash head-on but to add some uncertainty, deployment is done behind screens and then revealed. Both sides also place an objective in each sides half that counts as a routed enemy unit if captured. Victory is achieved by routing 50% of the enemy forces.

Covenanter Forces
9 * Foot regiments in 2 brigades
4 * Horse squadrons in 2 regiments
1 * Field artillery
1 * Forlorn Hope
Montrose Forces
3 * Veteran foot regiments (Irish)
4 * Foot Regiments (Gordon Foot)
2* Highlander regiments
5 * Horse in 2 regiments
1 * Field artillery
1 * Light artillery 


The Battle


Montrose deployed along the ridge-line behind a stream. On the right were massed the Horse and Highlanders with the Irish Brigade in support. On the left were the lower-grade Gordon foot. The plan was a simple one - to beat-back the Covenanter Horse through superior numbers and turn the flank the position. Meanwhile the weaker left would be refused to allow time for this to be completed.
 
The covenanters deployed with the bulk of their Foot in the centre. The Horse were on the left (opposite Montrose mounted) and half a Foot brigade deployed on the right to attempt a flanking manoeuvre.       

Covenanter centre and left


Covenanter right - Stuart demonstrates the art of Wargames pointing (again)

Montrose right - mounted and highlanders

Montrose refused left flank

Montrose flank-guards
The battle opened with a swift advance to combat by both sets of Horse. Honours were fairly even between the two sets of Trotters but the Covenanter lancers proved deadly and destroyed a squadron of Montrose Horse for very little loss. Things got worse for Montrose as both sets of Covenanter Horse gained the upper hand, pushing him back onto the Highlanders.
 
The cavalry clash

The covenanters gain the advantage 
In the centre the Irish Brigade advanced to support the Horse and soon began a fire-fight with the Covenanter Foot. Although well positioned the Irish shooting proved disappointing and casualties soon began to mount against them. Meanwhile on their right the Covenanter Foot advanced steadily and eventually came in range of the weaker Gordon  Foot holding the heights. 

Irish Brigade under pressure 

Montrose left under pressure
 

As the game drew to a conclusion Montrose superiority in Horse began to tell and they were able to force their opponents back. It was however too late, the beleaguered centre was all but gone and the Gordon Foot began to wobble. By now every Royalist commander apart from Montrose was also dead or wounded. Sensing that defeat may be close Montrose ordered a retreat and left the field to the Covenanters.  
 
Montrose Horse finally drive back the enemy
Montrose plan was a reasonable one but came unstruck as the mounted could not achieve a rapid enough victory to threaten the Covenanter foot. Some poor shooting from the Irish was then enough to seal their fate.  

Campaign Situation

This was the Covenanters second  victory meaning Montrose is ahead 5 territories to 4.


Sunday 5 June 2016

Punic Libyan Javelinmen (28mm Victrix) & Punic Elephants

After about 6 weeks painting I've now completed my first box of Victrix 28mm plastic Carthaginian infantry. The final unit is some Libyan javelin-armed skirmishers. The box contains enough to complete 14 of them. There are two different bodies and a good variety of wild hair-styles to chose from.  With the choice of arms you can produce a reasonably varied unit, unfortunately I fear that they are nt great under most rule systems though!
 
The completed Libyan Javelinmen

Too mean to buy transfers, so hand-painted shields

Close-up of the hair-styles


You can nt  have a Punic army without elephants so I thought it was time to feature them. I've got a total of five - three are Punic crewed and two are Numidian crewed.

28mm elephants are not cheap, usually between £15-20 depending on the number of resin parts used. So I decided I could probably produce something much cheaper myself. I was able to source five white-metal elephants in 25mm scale from ebay for about £20. The howdah's are painted card with the blankets and ropes made from miliput. The crews are from the now defunct Wargames Factory ranges, which have the great advantage of supplying lots of arms so you can easily find suitable posses. Not bad for a little over £5 each. 

Punic elephants with Libyan skirmish screen

Numidian elephants 

Close-up of the Numidian elephant

Close-up of the Punic elephant, which could also pass for Successor  
 

Wednesday 1 June 2016

Punic Libyan Spearmen - 28mm Victrix

Thanks to the long bank holiday weekend I've completed my second unit of Carthaginian heavy infantry. As with the first unit they are 28mm plastics from the Victrix Warriors of Carthage box set.

These are the Libyan spearmen in hoplite-style equipment of spear, linen armour, and hoplon shield.

The rather splendid shield transfers are from Victrix, although its the same chap who does LittleBigMan Studios range of transfers.   


The whole unit

Close-up of the command stand

Nice shields

Next up are the Libyan light infantry who are all tattoos and funky hair.