Title

Title
Tally Ho!

Saturday 30 December 2017

Christmas game - Marlburian battle

As has become traditional we once gain dusted-off the Marlburian / GNW / WSS figures for our Christmas game. Again we used Beneath the Lilly Banners (version 1) for the battle - version 2 has been out for some time but we're holding-on for version 3 to be released in 2018.

The scenario was loosely based on Blenheim with a combined Anglo-Dutch army deployed in the north against a larger Danish / Swedish army to the south, with a series of fortified villages along their line. 

View from the village on the Danish far right flank - my command for the day

Long shot from then Danish left flanks

The Danish centre

Reserve angle of the Danish centre with the Anglo-Dutch in the distance

Close-up of a British line regiment 

British gun with cavalry support to the rear
The Anglo-Dutch were significantly stronger on their right flank but outnumbered along the rest of the line, so decided to launch their main attack on the right. The Danes largely stood on the defensive hoping the villages would do their work and satisfied themselves with a series of spoiling attacks from their horse.      
Danish Horse stood too on the left

The British cavalry on their own left

My command holds a small village on the right flank.

A British regiment opposite me - they would prove a thorn in the side of the Danish cavalry 
On the Danish right the early moves saw good success - several British cavalry units were routed and some deadly fire slowed-down their infantry attacks.
   
Danish / Swedish horse make progress

The British attack on the left stalls.
On the Danish left though the opposite was true with the Anglo-Dutch winning the early cavalry combats and threatening to overwhelm the Danish defenders. On this flank the Danish were forced into a series of defensive operations designed to stabilise the position and allow the right time to win the game.

Danish left under pressure
Bloody cavalry melee on the Danish left
The Danish still retain a decent sized force uncommitted.

British horse charges a Swedish regiment- they went to to break them later.
The flank is stablised

Over on the Danish there was an attempt to force the issue with a steady advance but this was disrupted by several British cavalry charges which took time to contain and defeat.  

Opposing cavalry charge to contact 

British at bay on their own left 

My Swedes open-up on the advancing British 


The British centre
So the game ended a draw with both sides strong on their own right, but not having been able to force the issue and turn the advantage into a winning position.

As always with BLB V1 several quirks in the rules dominated the early part of the day as we learnt them again - firing/ melee/morale are all handled completely differently for the three arms and this takes some adjustment. Cavalry combat also tends to bloody and fairly random unless you can gain an advantage through preparatory fire. This has inspired me to commit to another Marshals and Muskets variant - this time for Marlburians.

So for some eye-candy to enjoy.....    

Danish regiment stood-too
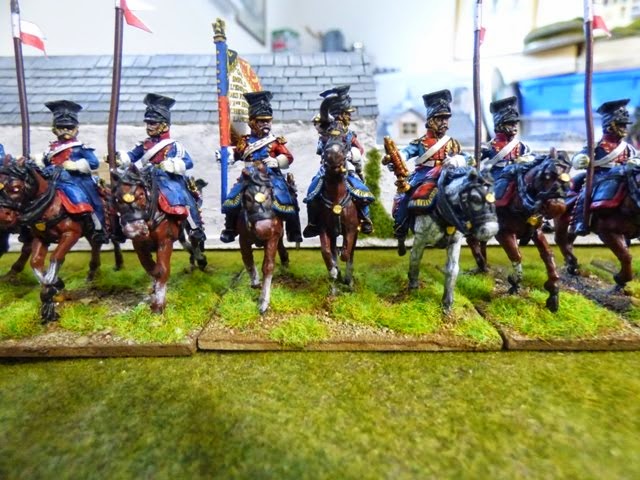
Danish horse

British line advances

Swedes are ready to get stuck-in

Danish commander ponders his next move

His British counter-part


Thursday 21 December 2017

Armati - Macedonian Successors vs Republican Romans

As there is only a week until Christmas we decided not to begin our new campaign (ECW) until after the festivities are over. As one of the members has just completed a Successor army (Antigonus one-eye) we decided to give them an outing and pit them against my Republican Romans.

The Antigonid army has a hard-core of pikemen supported by elephants, heavy cavalry, and several units of light infantry. They deployed with most of the cavalry on their right, supported by elephants and skirmishers. The refused left was held by light infantry with a central cavalry reserve
Antigoids right flank attack

The central pike phalanx

Peltasts covering the left

The Roman's are a more workman-like outfit with mostly heavy infantry supported by a few cavalry and skirmishers. The cavalry deployed to the left with the elite Triarii on the right.

Roman left - all horse

Roman centre with the Triarii on the right

Both sides had a similar plan with an attack on their own right flank whilst hoping to refuse their left. As the deployment screens were removed it looked like Antigonus would have the better of things with the elephants well placed to disrupt the Roman horse and open-up the whole of the flank. So the Successors pressed forward across the line trying to close the gap on their right flank.

The grand phalanx will advance

Skirmishers cover some scary looking elephants 

Spikey!

Flank attack pushes forward

For their part the Roman's sensed their best hope was an infantry grind and flanking manoeuvre by the fast-moving Triarii so they too pressed ahead. As the lines clashed initial honours went to the Romans as they started to inflict damage on the Macedonians right.

Heavy metal collides
Predictably through the Successor elephants and horse began to push through the Roman cavalry, who resisted stoutly in what would be a lost cause.
Roman horse in a pickle

Stomp stomp
As things looked bleak for the Romans they finally managed to get the Triarii into position on their own right flank and executed a smart turn to attack the end of the Successors lines.
Heavies get to the dirty work

The open Successor flank
Hampered by their pikes the Successors heavy foot were easy meat for the Triarii who rolled-up the line just before the Macedonian cavalry and elephants would attack the vulnerable Roman flank. So a 4-3 win to the Romans in a tense game that could have gone either way.  
Triarii roll-up the line

Elephants poised to intervene but too late

The Roman flanking move was an Armati classic but it was actually the Roman cavalry who made this possible by hang-on a little longer than predicted and the early success enjoyed in the heavy infantry clash which weakened the pikemen.

Told you the omens were bad...

Sunday 17 December 2017

Kings of War campaign - battle 4

After a few weeks break due to work commitments I was back in harness this week with a game of Kings of War over in Fishponds. This weeks scenario took place in some rolling countryside - the board is divided into 6 equal zones and points are scored for controlling zones in your own half (1 point each) or the opponents half (2 points each.)

Expecting the terrain to be denser than it was I dropped the Mamakil and mounted Sergeant Regiments  opting instead for additional heavy infantry and some Sargent Troops.

The Dark Elves set up to hold in their centre and attack on their right, with a few flying units on their left to snipe some objectives late in the game.

Dark Elves left - appropriately in shadow 

Dark Elves right

My plan was similar but having a larger force I could cover more ground. I would attack on my left with my best mounted / flying units, attack in the middle with my heavy infantry, and look to disrupt on my right to contest a few objectives. The Troops of sergeants would be used in the rear line to counter any sneaky flyers hopping over my front line.

Persian centre

Persian left

So the stage was set for a major conflict on my left as my main attack ran into the Dark Elves biggest effort. The elves winning the initiative pushed forward  on both flanks whilst holding back in the middle.
Elves main attack advances

Gargoyles and a mounted hero on the Elves left 
 I attacked a across the line and in  move that really disrupted the Elves plans immediately attacked the Gargoyles leading the assault with my mounted scouts. This blocked-up the flank and prevented them fully deploying their units for a precious turn. In the centre my heavy infantry pushed forward against the woods and I moved some cavalry and archers to counter the flying units on the right.
Persian centre and left attacks

The decisive battle on the Persian left
I then unleashed my heavy cavalry and air elemental destroying several of the units in the Elves main attack.
Persian making headway
As battle was joined on the left my heavy infantry was able to assault the Elves seeking to hold the central sector.  
The Persian centre and right advances carefully

Heavy infantry comes to blows
 Back on the left superior numbers began to tell as the heavy cavalry and flying carpets mopped-up most of the Elves and captured the objective.
The Persian left wins the day

Mopping-up
With both flanks in my possession and the centre under pressure we declared the game a win for the Persians in 4 turns. The score was 7-2 to the men.

Persian right captures the objectives
For an Elves-eye view see this longer write-up

http://fishpondswargames.blogspot.co.uk/2017/12/artefacts-of-kyron-campaign-battle-4.html