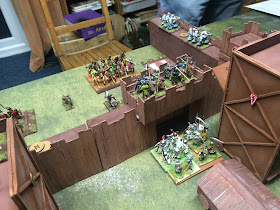
KOW has an interesting take on sieges. Walls and gates are essentially tall, high nerve, high armour units that can attacked distinct from the defenders occupying them. Attacking units have markers that enable them to combat these defences such siege towers / ladders to make them taller or battering rams to improve Crushing Strength. Both sides have artillery to attack the other and for this game the defenders had a sally tunnel to harasses the enemy.
Scenarios are also key to siege system, especially to give the defenders a reson to place an army outside the walls and still mount an attack. For this game the Crusader attackers had to have more Unit Strength within the walls than the defenders. The Saracen defenders had to hold a supply objective inside the castle and capture one of two outside the walls.
The Saracen defenders deployed the bulk of their infantry within the walls along with a Mamluk regiment guarding the supply objective and two pieces of artillery. The cavalry was split fairly evenly between the flanks, with a spearman horde in the sally tunnel ready to threaten the supply objectives outside the walls.
 |
| Saracen right |
 |
| The central fortifications |
 |
| Saracen left |
The Crusader plan was slightly different. Infantry massed in the centre along with the bulk of the siege equipment. The left was to be held by the Byzantines whose aim was simply to deny the Saracens the supply objective in their sector and tie-down the Saracen cavalry to protect the attacking infantry. On the right the bulk of the knights would attempt to crush the enemy while the siege artillery attacked the side wall, hopefully making a breach through which the knights could pour.
 |
| Part of the Crusader right poised to attack |
 |
| Siege artillery and more knights on the right |
 |
| The infantry attack - should nt there be trolls pushing those towers? |
 |
| The Byzantines on the left |
 |
| Tough day for the Saracens |
Centrally the infantry assault force lumbered forward and launched a combined siege tower attack against the walls and a battering ram into the gates. Some effective preparatory fire by the crossbowmen limited the impact of the defenders tower artillery which helped greatly. The struggle for the walls settled into a short grind.
Over on the Crusader left the initial success by the Byzantines was somewhat reversed by the loss of their cavalry and threats emerging to the objective marker. They found themselves outnumbered and a few flank charges left the Saracens in possession of the all important supply marker
Back on the right the Crusaders finally completed mopping-up the Saracen horse. The infantry in the sally tunnel finally arrived in turn 4 or 5 but found themselves surrounded and unable to challenge for the supply marker on their side.
The climactic final two turns saw the Crusaders breach the gate and captured the wall section holding the gate. Attacks against the sidewall and the other front wall were rebuffed by the defenders. Turn 6 saw the Mamluks charge through the gate and be rebuffed by the waiting foot knights, who in turn counter charged into the courtyard. Turn 5 also saw a flanking wall section fall enabling a second unit of foot knights to move into the courtyard.
 |
| Steady the buffs - Mamluks in the distance |
So the game ended in an honourable draw. The Saracens had managed to captured the 2 supply objectives needed and the Crusaders had occupied to the fortifications with 7 unit points to 6.
 |
| The walls come tumbling down |
So a fun end to a fun campaign - the rules are fast and brutal. With a couple of tweaks on terrain and banning of the corkscrew manoeuvre they produced free-flowing game that could be completed easily within a session at 3200 points.
Unit of the campaign - probably the crossbow horde as it performed consistently above expectations (no magic, flyers or heroes to lock it down) and had a threat projection effect beyond its points.


Looks like a good way to finish off a campaign.
ReplyDeleteA close draw always plays well and the scenario element meant it went to the wire
ReplyDelete