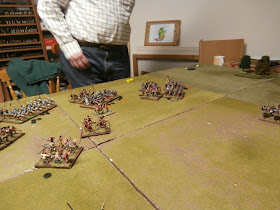
We began the evening with the troops already deployed for the first game from last week's session, so by playing slighter later than usual we were able to complete two games within the evening. We also road-tested by new movement trays for the first time. With the trays my units are about 30% wider than the Armati rules recommend, so we may need to do some maths at some point to ensure that does nt interfere with the all-important wheeling times / distances.
Game 1 - The Pass
Following the Roman victory in the last game the Dacian's fell-back towards their capital and occupied a position with flanks covered by rough ground. The Roman's deployment was similar to the previous game with cavalry and auxiliary infantry seeking to stall on one flank whilst a solid mass of legionaries attacked on the other. The Dacians adopted a more balanced deployment with cavalry and skirmishers flanking a solid mass of tribesmen. In classic style both sides planned to attack on their rights and hold their lefts.
 |
| The Dacians right - cavalry and Falxmen make ready to attack |
 |
| The Roman right with only a single unit of enemy skirmishers opposing it |
Seeing their was a race against time the Roman Right advanced quickly towards the enemy lines with the aim of cutting-through before the weaker left was overrun by the Sarmatians and flaxmen opposing them. A quick review showed the timing would be tight. Cunningly the Dacians had deployed a single large Heavy Division in their centre thus enabling them all to be designated the Reserve Division and so wheel at double speed within the deployment zone.
 |
| Roman right presses forward |
 |
| The Dacians begin their lengthy wheel |
First action was when the Roman's were attacked by the single unit of Sarmatians holding the Dacian's left. The cataphracts were able to sweep aside the auxiliary infantry but the legionaries were made of sterner stuff and brought them to a standstill.
 |
| Heavy metal clashes |
Meanwhile on the Roman left they had come to grips with the Sarmatians and Dacian's attacking there. Thanks to some decent rolling and a few well placed infantry charges they were able to slow the cavalry's advance and buy time for the main assault.
 |
| Delaying action from the Roman auxiliary and mounted |
The Roman legionaries crunched into the main Dacian line and began to grind-down the tribesmen as well as the now isolated Sarmatians protecting their flank. Despite a few successful Dacian break-offs the Romans made good headway against the lightly armed tribesmen. Due to their superior manoeuvrability they had managed to isolate the end of the Dacian lines and so avoid fighting against greater numbers.
 |
| The Romans begin their bloody business against the main line |
 |
| Sarmatians surrounded |
 |
| The main Dacian line still wheeling |
With the Dacian's flank attack somewhat stalled the Romans pressed home the advantage and broke through, forcing their enemy from the field.
 |
| Romans breach the line |
 |
| The end is nigh |
The battle ended with a 5-3 victory to the Romans. Again the ability of the Romans to focus on a part of the enemy and achieve a significant local superiority proved crucial to their win.
Game 2 - The Assault on Sarmizegetusa
For our second battle the depicted the Roman's attack on the approaches to the Dacian's incomprehensively named capital city. This time the Dacian's deployed in a more attacking formation with all the cavalry on the left flank and Falxmen / skirmishers on the right. To their backs were a wood that could offer shelter to the tribesmen. The Roman formation was more balanced with legionaries forming the centre and axillaries / cavalry evenly split to the flanks.
 |
| Roman left - axillary infantry and mounted |
 |
| Roman centre - the hard lads |
 |
| Roman right - more auxilaires |
 |
| Dacian right - fast-moving Falxmen |
 |
| Dacian left - Sarmatians make ready |
The Romans began with a general advance across the line as they sought to close with the enemy. The Dacian's sense a possible opportunity on both flanks and so also advanced whilst seeking to hold out in the centre.
The Dacians enjoyed some success on the flanks but their centre was unable to stand against the legionaries who cut their away across the field in typically bloody fashion. So whilst it ended 5-3 again, the Roman's had several badly damaged units and so could have lost with worse dice.
The conclusion
So the mini-campaign ended with a convincing Roman victory following their early set-back in the first game.
Whilst we have nt yet grasped the full subtly of close-combat manoeuvring we've certainly got the basics of the game. It has some characteristics in common with DBM but the command system is much more predictable and based around formulating the plan that exploits your strengths.
Certainly for the Romans loading one flank with tough legionaries and delaying on the other is always likely to be a winning plan against the slow-moving Dacians. Our next campaign will be a full one pitting the Carthaginians against the Romans - both armies with tough infantry and good command capabilities.


No comments:
Post a Comment