Campaign Standings
Saracens: 27 Glory Points
Crusaders: 20 Glory Points
After a week off we resumed with 2 battles. Both we have fought before but we swapped sides / players around so no one was fighting a side they had used previously.
Hammer and anvil - Saracen win, 4 points
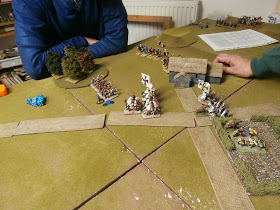
This scenario involved the English attempting to exit the far edge of the board. A force of Saracen infantry acted as the anvil with the Arab horse playing the hammer.
 |
| The English attacking force |
 |
| Part of the Saracen Anvil |
 |
| Long view of the table |
The early moves seemed to favour the English with most troops moving forward smartly and the Saracen cavalry mostly failing to appear apart from some Yeomen horse archers. However once the English came in range of the Arab foot archers they suffered an unlucky Battered on their lead bowmen. In Lion Rampant Battered units under fire can unravel quickly and that proved the case here as both units if English archers became bogged-down.
 |
| Saracen horse arrive |
With the arrival of the Saracen horse the English found themselves surrounded, under heavy fire, and with no effective way to respond. In the end they were forced to charge with their foot sergeants, which handed an advantage to the Saracen mounted sergeants.
 |
| English try to break out |
 |
| End Game |
At the close of play the English had lost several units and failed to advance more than a foot into the table. A victory for Saracen shooting and wobbly English morale. We've certainly found that mounted archers or well protected foot bowmen can be a winning combination more often than not.
The Convoy - Saracen win, 4 points to 2 points
In this scenario the Teutonic knights were escorting some booty-laden donkeys from one corner of the table to the opposite one. The Saracens deployed in the other three corners, with their foot sergeants blocking the Teutonic knights exit.
 |
| The Teutonic Knights |
 |
| Part of the Saracen ambushers |
The Germans initial move was to send its mounted forward to clear the Saracen force threatening its right flank. After a brisk fight they were able to clear away some of the enemy but at the loss of their Saracen auxiliary cavalry. The Arab horse archers though proved as slippery as usual.
 |
| The Teutonic's try to clear the flank |
 |
| Success! |
The initial threat removed, the convoy advanced down the road where some Saracen foot lay in ambush for them. As usual the fierce foot proved fun but short-lived, causing limited damage to the Teutonic foot. More successful though was the two units of mounted archers who wore away the Germans.
 |
| Ambush awaits |
 |
| Germans press forward |
 |
| The horse archers reappear on the flank |
Thanks to some focused shooting the Saracens destroyed two of the three units guarding the treasure and so the Teutonic Knights could not win. Victory was conceded to the Saracens.
 |
| Reverse view |


The morale rules contan a hidden nasty.
ReplyDeleteIf you suffer a casualty then you must throw at the end of the move. If you throw a number on two dice then subtract the number of casualties and come up with a number below your morale target (generally a four or five) tgen you becone, lije a Saveloy in the local chip shop, Battered! A unit that is Battered has to throw at the beginnng of the next move to unbatter itself...same mechanism as above. If it fails then it stays battered and loses a further casualty. So what the clever pkayer dies is get two full strength units shooting at an opponent. That is 24 dice looking for say 5s or above. That gives eight hits, on average, whch is two or three casualties. say its three and the opponent then throws a seven on the morale dice, needing to make a five...they go battered and next move throw to unbatter and fail and they are four down for the throw next move. If the first round of shooting only gets two casualties with two units firing, then in the next move you will get another go and the total casualties say four ir five now get taken off the morale total. So, if you can concentrate archery its a one way street. Getting two horse archer units shooting with a frontage of say three figures each is a way of concentrating shooting which will decapitate most opponents in two moves. There are subtleties and balances and foot knights are almost invulnerable, but fundamentally using bow units well is the key to success in this set, horse archers being particularly useful because you can move them from ne victim to another, putting the opponent iinto a battered state and on that downhill slope. If he throws well and recovers from Battered he does not move that turn, so he sits in front of the archers waiting for another 24 shots! Maybe it would make sense if the rules alliwed Battered units that recover to move, or perhaps if they had been playtested a little more.
Part of the answer might be an unintended consequence of our "can nt be out first ball" rule. One thing that should contain the mounted bows is they need 6+ to shoot or 7+ to shoot and move. so the smart move is to do that as a first go and then have the re-roll. we could restrict the re-roll to first moves only if its a move or attack.
ReplyDeleteGenerally though I think you are right - if the scenario allows then shooting can be pretty effective. That's probably why all the armies in the campaign now feature at least two missile units