Blog Pages

Pages

Thursday, 30 May 2019

The Great Game - battle 6

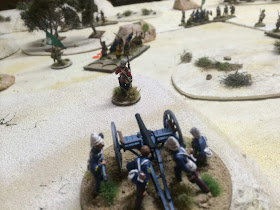
This is the final battle before the battle royale that will complete the campaign. The plucky Brits were charged with defending an oddly immobile heliograph station from attack by the Burpha's. They could begin with about 40% of their forces on table and the rest arriving as the dice determined.

The British opted to place three infantry units guarding the heliograph leaving the remaining 2 units, a couple of guns and the Bengal Lancers off table. The Burpha's filled the horizon in an attempt to swamp the Brits.


The Burpha pressed forward across the line with accurate artillery and rifle fire thinning the ranks of the British troops. Three moves in it was glum faces for the Imperial forces as they anticipated being overrun by a tidal wave of sword wielding maniacs.  


The rapid Burpha advance brought them in range of the British artillery that had arrived as reinforcements and they began to take a heavy toll on the Burpha cavalry that had tried to turn the flank. For two vital turns they pinned the Calvary and whittled them away.  More centrally accurate British volley fire at short range pinned the Burpha units as they tried to advance on the heliograph.


As the Burpha attack stalled, the Bengal Lancers arrived and promptly routed the Burpha horse before being shot-up by some lurking riflemen. The Burpha enthusiasm began to wane and one unit of Afghan deserters rolled double 1's three turns in a row for activation - a sign they might be planning to change sides again!  


As we entered turn 8 it was clear the Burpha lacked the strength to mount a serious attack on the heliograph. So it was declared a victory for the British - their first of the campaign. Both sides now enter the final battle with a single win and so equal numbers of Burpha allies.    


Tuesday, 28 May 2019

Rock on - earth elementals

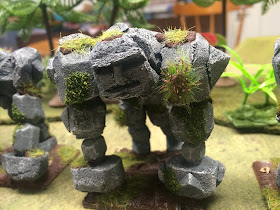
As well as some gaming I've also managed to complete a few painting projects over the past month. This includes some Earth Elementals for an elemental themed Nature army I'm toying with.

These fellas are built from blue foam offcuts and paper clips and each stand about 60mm high.


The rank-and-file unit is a horde of elementals ideal for anchoring any line. They have a vaguely gorilla look about them with the large shoulders and stooped gait.


The greater elemental stands a bit higher and is heftier overall. These are my second attempt - their legless cousins never got past the undercoat stage as they simply did nt look right. I'm pretty happy with these though.  


Monday, 27 May 2019

Salamanders vs Forces of the Abyss - Pillage / Kings of War

Bank holidays seems busy with gaming these days and this B/H is no different with 2 games already under my belt in Fishponds (Vanguard and Blood & Plunder). The third game is a second Salamanders vs Abyssals, this time the Pillage scenario where we each sought to hold up to 3 objective markers.

Both sides adopted a very similar plan by placing their mobile strike units on the eastern end (Salamander right) with a solid infantry centre and a refused western end of mostly shooters. The objective markers were equally placed along the centre line. The central and eastern objectives looked the main focus of the action.

View from the eastern end

View from the western end 

On the eastern side I had my AORs and Clan Lord with a banner to make them a fearsome -/20. The Abyssals had their Release the Hounds formation.  


With deployment done I spotted that my refused western flank overmatched the Abyssals having my Skyraiders, Skylord, and Skinks.  


Both sides pushed forward at top speed with their central infantry line, while the Abyssals advanced rapidly with their flank attack. The Abyssals focused their attack against the eastern-most unit of AOR using first the Hellhounds and then the Abyssal Horsemen. The AOR hung-on grimly for 4 turns before succumbing.


Centrally there was a bit of a grind but the Salamanders were able to decisively win the
western flank through heavy-duty shooting from the Skyraiders and a couple of timely charges from the Skylord.    


There as strong fight-back from the Ayssals and the Arch Fiend chewed-up the Skyraiders. By turn 6 only heroes remained on the western flank, leaving the objective uncontested.  


Centrally the Salamanders were able to break-down the Abyssal forces and claim the central objective. On the eastern flank the Abyssal forces retuned from their flank adventures but were unable to contest the eastern objective as the Lekelidon sacrificed themselves to stop them reaching within 3".    


So a 2-0 win for the Salamander in turn 6. Another interesting game and a few new units for the Abyssals fielded. Perhaps an important factor was that the Abyssals flank attack took them a long way from the objectives and so prevented them influencing the outcome of the game.


Saturday, 25 May 2019

A tale of two forts - a Vanguard game

Round three of the campaign began with a skirmish game - capture the egg. In this scenario both sides must try to capture a dragons egg and get it back to their starting zone. As you can see the terrain was a small port, with the dragons egg sat on the dock-side awaiting transport. A slight twist is that on a 6+ (D8) an angry dragon would appear and breath on the egg thief, possibly knocking them over and forcing them to drop the egg.


The Basileans deployed most of their troops in a tight clump, with the spooky Nightstalkers opting for a slightly more open formation. On this occasion I opted for a force with more Power Dice than previously; 1*Vet Sarg, 2*Sarg, 2*Paladins, 3*Men-at-Arms, 2*Scouts, 1*Wizard, 1*Vet Sister and the Ogre Guard.


The Scouts proved crucial for this scenario though. Being able to deploy outside my deployment zone they could begin the game within 4" of the Dragons Egg and so be certain of reaching it first.


After 2 moves the Scouts had seized the egg and made off with such speed that it was clear the Nightstalkers would be unable to catch them. So with the result all but secure I decide to attack with the remaining Basileans to score some experience, rather than simple withdrawing with the prize.


A fierce struggle ensued around a small warehouse near the docs. As is often the case the Basileans proved resilient but unlucky in the attack. Four rounds in I had lost 2 casualties without seriously hurting the Nightstalkers. The Ogre almost died but was rescued by the intervention of the Lizardman Priest.    


There was a slight wobble when the dragon appeared and downed the Scout, but a skilful flick pass to a waiting Sergeant enabled him to cross the line and win the game. The final score was 3 casualties to 1, in favour of the Nightstalkers but a Basilean victory.

 
As you can see the terrain looked great and its nice to have a themed board, even if the result was decided after turn 1.

Saturday, 18 May 2019

Salamanders vs Forces of the Abyss - Kings of War

I've now completed enough of the Abyssal forces to muster a decent 2000 point army. So I tempted aspiring Arch Fiend Sam into commanding them in his first game of KOW.


The Abyssals fielded 2 x Succubi Regts, 1 x Larvae Legion, 2 x Flamebearer Troops, 1 x Moloch Horde, 1 x Abysal Horse Regt and 1 x Despoiler Regt. In support were an Arch Field, a Champion, an Efreet and a Seductress.


The Salamnaders fielded a classic combo of  2 x Ancients, 2 x Ancients on Rhinosaurs, 1 x Skyraiders, 1 x Tyrnats, 1 x Ghekko and 1 x Primes. In support were a Clan Lord, a Mage Priest, and 2 x Lekilidons.


Both sides advanced on the Salamanders left towards the centrally placed hill. In the centre and on the Salamanders right the armies advanced on cautiously to occupy some cover.  


The Ancients stormed up the hill and routed the Despoilers whilst wavering the Molochs. Having Fury they counter charged despite the waver but could not push back the Ancients. On the Salamanders right the Abyssal Horsemen threw well and routed the Prime anchoring the flank.


The surrounded Molochs were hit from two sides by the Ancients but the dreaded snake-eyes meant they stood despite taking 15 casualties and were in turn able to flank the Ancients wiping them out die to some previous hits.  


They did not survive a second flank attack and so some order was restored in the Salamanders centre. the Succubi were able to damage a couple of units but were dispatched just in time to allow the Salamanders infantry to meet the threat from the Abyssal horse in the rear.  


The game finished with the Abyssals reduced to about 10% of their points and the Salamanders on about 30%. The Abyssals proved tough opponents and have good features; almost everyone has Fury and Regeneration making them hard to grind down in combat, especially as the weaker armoured units tend to have Ensnare. They also have a good selection of fast / flying units and Efreets pack good shooting punch in a tiny area.


We also managed to get a few new units onto the table in the form of a Larvae Legion, 2 Troops of Flame bearers and the Champion. The Larvae use jelly maggots intended for fishing bait and tombs from Scotia-Grendall.