Blog Pages

Pages

Wednesday, 22 August 2018

ACW Campaign - week 8

This marked the penultimate game of the campaign and the final battle of 1864. Somewhat  outnumbered the Confederates fell-back to defend a river with a series of fords. There were two objectives near fords on the Rebs side.

Having four fords to defend the Rebs were forced to spread their forces along the whole front of the river, with guns scattered to give fire support. They dug-in in and so in most cases had some defences to ward off the Union attacks.

Rebs right

Rebs centre

Rebs right
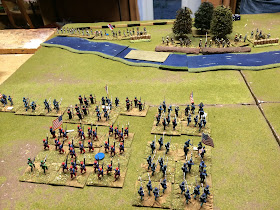
The Union opted to deploy the bulk of their infantry on the flanks and a large artillery park in the centre. Their plan was an intense bombardment  followed by an assault on the weakened enemy across the fords. General Haig would have been proud.

Union right

Union centre

Union left

Under cover of the grand battery the Union infantry advanced on the enemy hoping to get in musket range  and add to the fire. The Union right was first into action but proved disappointing as they caused limited damage. The left advanced boldly but found themselves facing undamaged Rebs and so were forced into line to engage in musketry.

Union right goes into action

Union left advances in depth

Rebs-eye view 

With the Rebs largely undamaged the Union settle into a steady fire from guns and muskets as the crossing simply looked impractical. Although loses were light on the Rebs side it was coming at a great cost as they were burning through command cards at a great rate as they sort to mitigate the damage from Union fire.


After a few hours play the Rebs had only 4 cards in their hard while the Union still had 12. It was clear that the Rebs would simply run-out of command cards and so lose the game that way. With no prospect of  serious damage on either aside the Rebs withdrew ceding the crossings, and victory, to the Union.


Thursday, 16 August 2018

British 8th Army in 28mm for Crete 1941

The next campaign we plan to play is a 28mm skirmish games based on the ill-fated Commonwealth defence of Crete in 1941. So I've been busy painting half of the British forces, roughly a platoon plus support elements.

All figures are from Perry Miniatures, mostly plastic infantry plus metal support elements. I find Perry plastic infantry quite slender by comparison with some manufactures but they paint nicely.

First-up is the Bren team plus NCO - the heart of the infantry section and most of the firepower. The No.2 features additional ammo pouches to carry extra magazines.
 

Next we have the riflemen, traditionally the manoeuvre element of the section.


I've managed to complete one of the two maxims I bought, this one has 4 crew.


I've also done part of the HQ section - here we see the officer, radio operator and the 2" mortar.


Finally a close-up of the Bren and No.2


Tuesday, 7 August 2018

ACW Campaign - week 7

As we entered 1864 our first game was an attack vs defence. The defender would be dug-in around a farm house with woods on either flank. The Union won the scouting role so we decided to defend to best exploit the shooting of our largely veteran infantry. The battle also saw the first regiment of coloured troops taking to the field.

Deploying first the Union adopted a simple plan. The smaller units would hold the trenches while the larger units of reinforcements guarded the open right flank. Guns would occupy the flanks to get enfilading fire against the attackers. The coloured troops would form the off-table reserve.
 
Union centre

Union left

Union right - the open flank
The Confederates opted for a single concerted attack against the Union right. A thin screen of cavalry, guns and infantry held the right/centre while massed columns prepared to attach the Union right with support from a massed battery.

Rebs right

Rebs centre and left
The game began with a mighty fusillade of Reb artillery fire and a cautious advance from their infantry. Disproving their poor reputation the Reb guns tore big holes in the Union lines and 2 turns into the game we feared we might simply be blown away.  So desperate were things that I was forced to deploy my purple dice that are only used when the luck is really bad.


Fortunately as the infantry approached our lines the Rebs fire slackened and some return fire was possible, but there was still a real danger of being overwhelmed by the grey wall.


As the Confederates prepared to charge the card activation system came to the fore. The Rebs had carefully built a hand that was ideal for a devastating attack, but the Union played a card that forced them to discard D6 cards. As you might guess we rolled 6, thus depriving them of the whole hand and their whole turn.  

We then settled into a period of range-fire interspersed with occasional charges from the Rebs that were easily repulsed.

Reinforcements arrive


With the game apparently drifting to a draw, we noticed that casualties had been accumulating steadily on both sides and activation cards were dwindling. It was in fact perfectly possible for either side to win by hitting the enemies breakpoint or the someone running-out of activation cards.

In a cagey last few rounds both sides sought a decisive shooting advantage. In the end it was the Union who had a strong round that hit the Rebs breakpoint and left them with only a single activation card to play.


So a tense and enjoyable finish which could have gone either way with a little luck. 

Sunday, 5 August 2018

Saga - Saracens vs Milites Christie

Over the weekend I visited Bristol and played the second of our occasional series of Saga Crusades games, again featuring my Saracens vs the Milities Christies.  The scenario this time was Holy Ground, in which points are awarded for holding terrain, more for those in the centre / opponents half. The scoring scheme works such that you can nt accumulate more points than the Turn number, so holding terrain later potentially has more value than early.

Anticipating lots of combat I went for a slightly more combat oriented Saracen force this time:
2 * Hearthguards (6 figs) = 3 points
2 * Warrior cavalry , bow (8 figs) = 2 points
1 * Levy foot archers (12 figs) = 1 point

My plan was a simple one as seems best for Saga. The levy foot would advance a short distance and secure my objective. Ghulam's flanked by horse archers would head for the central hill and if a chance presented it perhaps grab the enemies objective. I hoped to benefit extensively from my abilities that favoured shooting then charging (Brotherhood) and from those that boost combat such as Coordination and Damascus Steel.  Being equipped composite bows gives the horse archers free shots but at the risk of accumulating Fatigues.


The Milties Christies plan looked similar. They looked to capture their own objectives with some crossbows. Knights and foot sergeants looked to attack the hill with a further unit of Knights as a reserve.


I was lucky enough to win the initiative and so pushed rapidly forward to capture the hill in the centre for the glory of Saladin. Predictably the Knights charged headlong into my Ghulam's but I had saved sufficient dice to use Coordination (additional att/def dice). Some decent rolling saw the Knights bounce off with heavy losses, which largely ruled them out of the game.  


Seeking revenge the Crusaders launched a fusillade of crossbow fire against my horse archers scoring 4 hits and needing 2+ to kill. It seems though that Allah was smiling on the Turkmen as the Crusaders rolled double snake-eyes to score no hits!

I retorted with 2 rounds of fire and manoeuvre from the horse archers on the right. Chainging together free shots from composite bows and Multiple Shots plus damaging shots from Armour-Piercing Shafts, with some fatigue recovering moves from Thoroughbred I was able to chip-away at several units and badly wound the warlord without being in any real danger of attack.

missed me!
Falling behind in the points, the Knights launched second unit up the hill into my depleted  Ghulam's, destroying them but being badly damaged in turn be a second unit of Ghulam's and finished off with further horse archer fire.


The game ended with the central hill contested but crucially the Saracens had too big a lead to be overtaken by turn 6, so the battle stopped a turn early.

 
An interesting game and one that featured much more of the horse archer tactics from the Saracens than the previous one. The scenario and dice (lots of uncommons / close-packed enemies)  favoured the use of the Multiple Shots and Armor-Piercing Shafts more than the first game. I even managed a Ruse at one point to prevent the use of a powerful Milities Christie ability than gives 6 additional combat dice if charged.

The Milities Christie seem much harder to use than the Saracens, especially the balance of using/not the Orison ability. This generate a pool that can be used to mitigate hits, thus potentially swinging a combat. However stacking the pool limits other options that move so you need to plan ahead carefully.    

Friday, 3 August 2018

Late Roman / Byzantine infantry

A few months ago I completed some Byzantine heavy cavalry for use with the Crusaders. To keep them company I've completed some Gripping Beast plastic late Roman infantry. They are nt quite right for the Byzantines but I'm hoping I will get away with them as poorly equipped boarder troops.   
 
Two units based for DBX or Armati

White shields

Red shields

Rear view

Thursday, 2 August 2018

ACW Campaign - week 6

For this weeks game we're again in 1863, with a fairly simple encounter game.  Both sides are seeking to capture an objective in the opponents deployment zone, but the notional defender has a half filled with cornfields. These reduce the effectiveness and range of shooting but don't hinder movement. The pregame phase led to the Union having 3 less activation cards than the Rebs (21 to 24).

Being out scouted the Union were the attackers and had to deploy first. Seeing that the cornfields would nullify the artillery they opted for a main infantry attack on the left with a grand battery on the hill to pin the defenders in the fields. On the right a skirmish line would try to tie-down the enemy.
 
Union centre


Union left
Having seen the Union setup, the Confederates massed for an attack in the centre with most of their artillery seeking to block the Unions main assault.

Rebs centre

Rebs right

Rebs left
The Rebs pushed though the cornfields with a massed attack seeking to smash through the Union line and grab the objective. Seeing the threat the Union forces on the left swung inwards to flank the Rebs attack. This had the desired effect; slowing down the attack and diverting some of the Rebs infantry to cover the threat.    


With the Rebs attack stalled, the Union pressed forward and gave a lively fire into the Rebs ranks. Good cards and good dice gave them the upper hand in the firefight and rapidly thinned the grey ranks.  


Sensing a chance for victory they pressed forward looking to complete the job. Feeling under pressure the Rebs gave ground in the hopes of prolonging the battle and inflicting a few more casualties. This led to the Union having to advance even further.  


Running low on activation cards, the Union threw everything into a final fusillade in order to hit the Rebs army breakpoint. But the dice failed and so the Rebs won the day, their first win of the campaign.


In the end the Union lost as they had no activation cards and the Rebs still had 2 left. So the missing 3 cards proved the difference. Perhaps the Union should have been more cautious and saved cards but we anticipated a quick victory and so used cards aggressively.