Blog Pages

Pages

Tuesday, 24 April 2018

Aramti Pyrrhic Wars - Heraclea, 280BC

The opening battle of the Pyrrhic Wars took place near Tarentum in southern Italy. The campaign began with Pyrrhus crossing from Greece into Italy in response to a request for aid from the Tarentines. He found himself facing Consul Valerius Laevinus across an open field near the river Siris

Both sides were roughly equal in size but different in character.  The Romans field mostly Hastai/Principes supported by Latin allies and some cavalry. Pyrrhus had a mixture of pikemen of various qualities and crucially a small force of elephants.

Pyrrus deployed with massed pike phalanxes on his left and the weaker Greek allies mostly on the right. The left flank was occupied the heavy cavalry with skirmisher support and the right by elephants with peltasts in attendance. A cavalry attack on the left looked the main effort.

Pyrrhic left

S-pikey centre

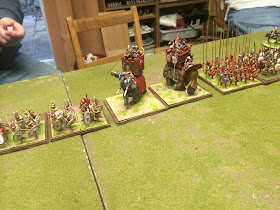
Elephants and support

The Romans opted for a less balanced deployment. The left (opposite the elephants) contained the cavalry, light heavy Spanish, and a unit of Triarii - plenty of manoeuvrable units. The centre was a solid mass of Romans / Latins and the left had two more Triarii, offering both offensive or defensive options.  

Roman left

Solid centre

Triarii in the distance

Close-up of the pikes

The opening action was on the Pyrrhic left as he sought to protect his elephants from the pesky Spanish LHI, whilst advancing several units of Greek allies to close-down the Roman's space.

Peltasts move to cover the elephants

Romans advance

The Spanish forged ahead and were able to cut through the Peltasts with aid from some ~roman heavy cavalry. With the elephants under threat a pike unit intervened to try and slow the Roman advance.    

LHI try to reach the elephants

Some tricky manoeuvring

On the Roman right the successor cavalry advanced rapidly forcing the Triarii to deploy into blocking positions to protect the flanks of the Roman main lines. This met with mixed results - the Greeks were easily repelled but two high-rolling rounds saw the Companions dispatch one of the Romans.  

Triarii cover the flanks

Things go badly for the Roman veterans

The Companions are victorious  

The mainline clashed in the centre in a classic pilum vs pike encounter, with things pretty even in the first few rounds. In a bold move the Romans through their light cavalry into a Greek unit attempting to turn the right flank. This did not receive the luck it deserved, but did delay the attack for three precious turns.  

Clash of the lines 


Cavalry thwart a flank attack  

Over on their left the Romans had some success against the weaker Greek allies but were unable to exploit this rapidly enough to roll-up the Successors flank. The Romans also suffered as they lost a unit of heavy cavalry to the elephants.

Greek allies crumble

Romans grind forward but all too late to win 

In the end time ran out for the Romans as their right crumbled under a combined assault from the Companions and a unit of Greeks.  

Heavy going in the middle

A close battle but a win for Pyrrhus by 7-4. It was closer than that makes it seem, but the Romans had a couple of poor combat rounds at just the wrong time and so failed to destroy some of the wavering phalanx. Perhaps the deciding factor though was that the Roman horse was delayed much longer by the elephants than the Companions were by the Triarii and sol had no meaningful impact on the battle.

Pyrrhus secret weapon

Sunday, 22 April 2018

Lizardmen / Salamander reinforcements for Kings of War

I've had a little rash of basing / finishing off this week so have produced a few more units for my Lizardmen (Salamander) army. All three are hard-hitting units that should chew through their prospective opponents, which looks increasingly likely to be The Herd.

The first are hard-hitting cavalry from Game Workshop. I originally bought these to be a unit of lancer cavalry but the models are so large they have been upgrade to Ancients on Rhinosaurs


The second unit is a Battle Platform, a tough blocking unit, able to withstand considerable punishment from the enemy.  This is a plastic model from Schleich with a homemade howdah decorated with items from the cavalry sprue. At £11 its a bargain.


The final units are two Tyrants hordes - one of the better melee units available in the army.  They are fairly slow but a high defence and Fury special rule means they should get a counter-charge in with any luck. These are also Schleich, this time from the "mini" range. At £2 - £2.50 each they are great value and pretty decent models too.  


I think my favourite so far is the Ancients on Rhinosaurs - its my first batch of new Games Workshop lizardmen and I think the Aztec styling on them works well.

Wednesday, 18 April 2018

Pyrrhic Wars Armati - Week 1

Our newest campaign is to refight the major battles of the Pyrrhic Wars using Armati. The war pitted Pyrrhus, King of Epirus, against both the Romans and Carthaginians between 280 and 275 BC.

To familiarise ourselves with the rules / armies we began with a practise game between Roman Republic and the Successor forces. Both sides have similar command abilities but different strengths. The smaller Successors have  hard hitting heavy cavalry, elephants, and the tough pike phalanx. The larger Roman force has greater manoeuvrability through the Triarri and Spanish LHI.

Pyrrhus deployed the massed phalanx centrally with Companion cavalry on the right and elephants supported by lights on the left. A strong advance on the right and in the centre looked likely.

Pyrrhus phalanx

The Companions

War elephants

The Romans deployed their own horse on the left, with skirmishers support, placing them opposite the Companions. The centre was occupied by heavy infantry with the Triarri and Spanish LHI on the right. The plan was to hold whilst the Triarri flanked the phalanx and the Spanish destroyed the elephants.

Roman horse and supports

Roman / Latin heavies

The flexible flankers

Close-up of the Warlord Games elephants

As the battle opened, the Roman centre began a gentle wheel while the skirmishers advanced on the left to harass the successor infantry. Unfortunately they got too far ahead of their support and were stomped by the advancing Companions.  

Left wheel chaps!

Skirmishers advance - this would end baldy!

Centrally the heavy infantry lines drew close together, but with the Triarri moving into a flanking position the phalanx was forced to slow and partially refuse its flank. At the same time the Spanish pressed forward to attack the elephants.    

Lines clash with the flanking Romans at the top


Spanish try to reach the elephants


The Romans looked good on the right, but on the left the tables were turned. The Successor Companions ploughed into the Roman horse and rapidly cut through them to threaten the Roman left.

Roman horse crumbles

There was then a key moment in the game. The Successors had an overlap on the left of the Roman line but were unable to exploit this as they lacked the "breaks" needed to split-up their formation. So the Companions would need to move across to attack the Romans.

The aborted flank attack 

Triarri rough-up some Greeks

As the battle raged in the centre it was a race between the Companions and the Triarri to destroy the ene3my before their own lines collapsed. In the end it was the Romans who were able to act quickest and so win the game 5-3.

Romans roll-up the flank

The phalanx succumbs 
        

Monday, 16 April 2018

Kings of War - the campaign climax

This weekend saw the final battle in our Kings of War campaign over at Fishponds. The scenario for this 7th battle involved both sides trying to carry their magic artefacts to the portals so they could be empowered - the winner being the one to activate the most.

The star gate portal 

I entered battle at a disadvantage as I only controlled one of the three artefacts, having lost one in the last game, so a cunning plan would be needed. So I deployed my strongest units opposite the centre and right-hand portals (kings guard and elephant hordes), with archers between and Sergeants as fast-moving blockers in front. Against the left-hand portal I deployed chariots, my flying carpets and a further unit of kings guard with my artefact. Between sat my knights ready to support my artefact unit or try to flank the centre portal.

My plan was to attempt to use my flyers and sergeants to lock-down the enemy moves whilst placing two tough hordes on the portals, hoping to steal one artefact whilst being left unmolested with my own. Moving first would be a key advantage to get my blockers in place before the elves could move.    
The elves plan seemed to similar but very focused on the centre and right-hand portals, with a flank  attack against my right lead by several powerful combat units. This flank attack forced me to make a comprise and deploy by Djinn to oppose the fast-moving units there.

Elves troops focused on the centre / right portals

Persians

Fast-moving elves chaff

Elephant and kings guard hordes ready to grab the portals

Luckily the gods smiled on the Persians and I won the imitative, allowing me the first move. So I pushed forward with my blocking units, quickly overrunning the centre portal and contesting the right-hand one. The elves responded by pushing forward their heavy infantry in the centre and beginning the enveloping move on my right  

Blocking units in place

All very messy in the centre

Seeing the threat to the centre the elves were forced to divert their cold-one knights towards the right-hand portal where my elephant horde lay in wait. Meanwhile on the left my chariots (2-man flying carpets)  began chewing through the artillery deployed on a hill - these pesky sods had hurt my knights badly in the last game so I was keen to take them out before there was no repeat.

Cold-one riders move into position

My carpets brave the flak

An intense fight developed around the right-hand portal, as my elephant horde clashed with the cold-one riders. At 400 points its a mighty unit and  duly crunched through the knights with support from my Djinn.

Crunch - only one winner here!

In the centre though things looked shaky - my kings guard horde holding the centre portal attacked and badly damaged by a unit of elf spearmen. Only a very poor nerve role saved them from defeat.

Their blood-up, the elephants now crunched into an artefact carrying spear unit, once again supported by a flank charge from the Djinn. The elves were quickly dispatched leaving me in possession of a second artefact.    

Persians holding on in the centre

Nellie eyes up another victim

Back in the centre the final action saw the knights charge into the flank of the final artefact carrying unit, beating them back and capturing the final artefact.

End-game

So after 5 turns the elves were routed, leaving the Persians holding all three artefacts and able to claim a hard-fought victory. The game was very close until the 4th turn when a sudden collapse in the elfish formation left them vulnerable to devastating flank attacks.  Moving first has been a major advantage as it enabled me to limit the elves ability to manoeuvre  and force them to respond to my plan.

The elephant horde has impressive stats, but at 400 points its a major gamble to take it. In this scenario the Djinn (greater air elemental) proved the star unit as it launched a series devastating flank attacks and routed 3 units as well as holding off a powerful hero who could have flanked my elephant horde .


Nlow the man down