Blog Pages

Pages

Sunday, 26 November 2017

Kings of War campaign - game 3

This weekend saw me in Bristol for the third instalment of our Kings of War campaign, that features my Persian-themed army against the Dark elves (Kin). For this game the terrain was rolling grasslands with three powerful artefacts to capture.

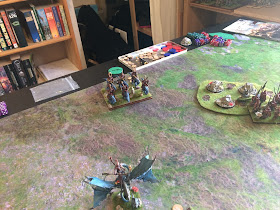
I slightly misread the brief in two ways - firstly I thought the idea was to hold the most objectives by the end and second I had nt spotted you would retain the artefacts for the next game - d'ho. So my set-up was to challenge for only 2 of the 3 objectives, with a solid infantry core attacking the centre and a large mounted force looking to hook to my right. I massed my archery on the left to slow the enemy and deployed the Mamakil wide left to stop the elves from executing an easy flank attack of their own.

Persian left with the imposing Mamakil

Persian centre and right

The Kin had pretty much the same plan - a strong attack on their right with the small force on the left to delay me. The difference was Kin's left flank force was of lightly equipped flyers and was easily swept aside so caused no delay.

Kin's right and centre, with the flyers in the distance
I began the game with a rapid attack by all my cavalry on the right flank quickly capturing one of the artefacts and pushing past the flyers. I also attacked the scrub land in the centre with my heavy infantry.  

Persian cavalry with flying carpets in close support

Infantry advances
The Kin responded in kind with a rapid advance in the centre and a more cautious attack on their right flank led by a hero and lizard riders.

Kin's right on the attack 
The faster Elfish and Lycan units were able to secure the centre objective and I was forced to withstand a charge from them. the Elves dice were poor though and a desperate tussle developed in the scrub over the precious artefact.    
Scrap over the central artefact

The arm wrestle continues
On the right my mounted troops moved forward almost completely unhindered allowing me to threaten the Kin's centre and rear. With cavalry moving 18"-20" per turn the attack developed rapidly. On my left the Mamkil was assaulted by the elves and routed, but it bought me precious time for my own attack.
  
Flank attack pushed ahead with Flying carpets to the fore

The Kin clear the Mamakil
 In the end my superior numbers told and I was able to throw back the Lyans and break through the centre with an air elemental pushing into the Kin's massed archers to distract them
The centre falls 

Blow the man down!
The Kin's lizard riders made hay against the lightly armed human archers, again buying me 2 turns with their sacrifice.  By now most of the Kin's army was dead and the rest was pushed-back into a small corner to the table under attack from two sides.
Lizards assault the flank but too late 

Persians hold most of the table
So the game ended with 2 artefacts in the Persian's possession and most of the Kin routed. a good victory but definitely helped by some below average shooting dice from the Elves. As the games are strictly timed at 6 moves (we played this to conclusion in 5) I applied my Armati learnings about the importance of time over space.

For a Kin's eye view of the battle look here
http://fishpondswargames.blogspot.co.uk/2017/11/artefacts-of-kyron-campaign-battle-3.html


Friday, 24 November 2017

Forward, Victory is near - WWII campaign, week 5 battle 1


With the Russians breaking-through in turn 4 we now enter the last round of regular battles for this mini-campaign. We see the Germans still hung-up on the start-line attacking the river crossing for a 4th time. As the attacker they received +4 points of reinforcements which they spent on 2 infantry squads, a StuG III, and a medium mortar. The Russians opted for 2 * AT guns, improvised AT weapons for 3 squads and a some scouts. Overall a decent advantage for the Germans given their Veteran status.
Table from the Russian left

Table from the Russian right 

The Russians retained their tried and trusted defence of clustering infantry near the victory markers and keeping the AT guns off table until the tanks appeared. The Scouts were placed forward in wood hoping to rely on their Veteran status and good use of cover hold-up the Germans
Russians on the left flank

Russian right flank

Scouts guard the centre
The Germans deployed across the board as they have done on several occasions, with attacks in the centre and on both flanks. This time the attacks were in greater force though due to the additional infantry reinforcements taken.

Germans deploy in the centre

German heavy weapons support an advance on the left
Sensing they were outnumbered the Russians laid-low as the Germans pushed forward across the river on left, right, and centre. With the game half way through loses were minimal on both sides as both manoeuvred for advantage.
Splish splash

Splosh


The appearance of the STuG prompted the Russians to deploy their AT guns in the centre in a good position to cover the key approach routes for the assault gun. This caused caution in the STuG's crew who tried to lurk out of sight behind a wood and snipe away at long range. Safe, but of limited impact on the battle.
The AT guns deploy and send the STuG into hiding 

A classic camo tie 
As the end of the game approached the Germans launched a series of assaults with covering fire from their weapons teams and mortars. Accurate fire mauled the Russians in the centre forcing them to redeploy troops from their right to cover the gaps and secure the AT guns.

German forces build-up on the Russian right

Germans entre the wood - a standoff with the Scouts

Soviets holding the centre are blown-away

Russians redeploy to guard the guns
On the Russian left the assault quickly bogged down under heavy fire from Russian infantry and a maxim gun.  Crucially though this had drawn away precious units from the centre and right.
German attack on the left runs into trouble
On the Russian right the inevitable pressure told and the Germans were able to break through to secure 2 of the 3 victory objectives.


Germans push through the centre to victory
So after 4 tough battles the Germans had finally broken through their start-line and move into the Russian positions. The STuG even survived for once! the secret was likely the more aggressive use of the Germans to outmanoeuvre the Soviets rather than a slow grinding firefight that could not be resolved quickly enough to win.


German armour survives for once

Sunday, 19 November 2017

Victory is Near, WWII Campaign - Week 4 battle 2

The second battle of this turn saw us returning again to the Russian-held river crossing that marked the German start-line for the campaign. As this as the German's third attack on this table they received a heavy artillery bombardment and +2 point of reinforcements.

Regular readers will be familiar with this table by now - the shallow stream has two bridges and a ford, with scattered woodland and fields covering most of the ground.

Table from the Russian left

Table from the Russian right
Expecting the Germans to have amour the Russians went for 2 * medium AT guns as their reinforcements. The Germans opted for a mortar, a StuG III and an infantry squad. The Germans picked the StuG as they are beginning to suspect the Panzer IV could be cursed as it seems to rapidly in every battle!

The Russians plan was largely to react to the Germans deployment and try to ensure their precious AT guns could fire at the StuG as they had no other AT capabilities. The Germans for their part spread across the table with the StuG in the centre and infantry overloaded on their left flank opposite the foot bridge.  

Germans deploy on their right

Germans sneak forward in the centre

German infantry on the left flank 

And finally the STuG 

Sensing an infantry assault on the German left the Russians responded by placing additional and both their Maxim's to face this threat. The preprogrammed artillery bombardment rained-down on the Russian's front line but on this occasion fell mostly wide of the mark and caused little damage.
  
Russian hordes on the right

The all important AT guns - centre piece of the defense 

Russians near the central bridge

The Russians on the left
Seeking to shift the axis of attack the StuG moved from the centre to support the assault on the German left. As it pushed across the table it came under flanking fire from the Russian AT guns deployed near the road bridge. The German's run of bad-luck with their amour continued as the second shot penetrated the side of the StuG and brewed it up.

Germans press forward as the STuG repositions

Boom!


With this set-back the Germans paused for a re-plan and began to lay down fire on the Russians whilst seeking positions from which they could later launch assaults.

Germans base of fire in the centre

The ford still under Soviet control

The STuG well ablaze

The superior German firepower began to chip-away a the Russians but it was a slow business and the time was ticking-away towards darkness, which would leave the Soviets in possession of the victory markers.

Russians on the right

Germans mass for the attack against the Soviet-held hill

Sensing their moment may be slipping away the Germans launched a series of attacks across the line against the weakened Russian forces. Assaults on both flanks were repulsed due to some poor German rolling. The attack in the centre was pinned-down as it tried to capture the hill dominating the centre of the Russian position by flanking fire from Maxims and AT guns.

Desperate struggle on the German left 

The attack stalls under flanking fire


The main attack grinds to a halt
  
So a third defensive victory for the Russians at the river crossing but a tense game. Its certainly true that the Germans were unlucky on the melee dice but perhaps they were a little slow in getting their assault underway which meant they did not have time to develop their attack fully. Loss of the StuG and accurate Soviet flanking fire.