Blog Pages

Pages

Sunday, 30 July 2017

Early Romans vs Bronze-age Europeans in Armati

We had an unexpected visitor to the Club night this week when Nigel arrived with his newly completed Bronze Age Europeans - all very Conan-the-barbarian. So we pitched them against some Early Romans using a mix of Carthaginians and Republican Romans

The Army Lists

Add caption
Early Romans +4 Init, H:4, L:2
2 x HC  4 [0] 0 +1 Prot
5 x PH  7 [1] 1 +2 Prot
9 x SI   3 [1] 2 +2 Sling
2 x LI   4 [1] 2 +1 Prot, Javelins
4 x LHI 4 [1] 2 +1 Prot, Javelins

Northern Europeans
6 x FT   5 [0] 0 +1 Prot
10 xWB 5 [1] 3 +1 Prot
6 x SI    3 [1] 2 +2 Prot
2 x HC  4 [0] 0 +1 Prot
2 x LC   2 [1] 0 +1 Prot
1 x SI     3 [1] 2 +2 Prot
  
So lots of slingers on both sides. The Romans had some decent infantry but on an open table the LHI were vulnerable. The Bronze-agers had the better cavalry and a numbers advantage.

Deployment


The Romans were concerned about their relative weakness in their LHI and SI. They were also hampered by only having 2 Light divisions, so having to deploy large blocks. So they adopted a largely defensive position - a large block of phalanx covered by the slingers, supported by LHI on the left flank with the cavalry seeking to turn the flank.   

Roman right - massed slingers with spears behind

Roman left - the LHI

Roman left - the cavalry on the outside


The Bronze-agers deployed a large mass of warbands in the centre / right, with spearmen holding the right. The cavalry were split between the flanks, with the HC on the left as the attacking option.


Bronze-agers left - HC and slingers

The spearmen

Massed warbands

The right - SI and LC 

The Battle


With the Romans on defensive duties the Bronze-agers advanced with their warbands and on the flanks, holding back the weaker spearmen. The Romans responded with an advance from their HC against the Bronze-agers right flank in an attempt to chase-off the light troops.

The Roman right


The Roman left
Roman cavalry charge-in
The Roman advance met with initial success sweeping aside the SI, chasing off the LC and destroying a unit of warband. A good result but they became a little over confident and advanced too far in chasing down the Bronze-agers lights.

In the centre the spears clashed and the Romans held-back their LHI fearing they would be overrun by the warbands, who advanced smartly into them. In the process the Roman flank guards were forced to deploy.  


Centres clash

Roman right
Spears line-up for a shove
The Romans fought stoutly with even the LHI performing above expectations, but they found themselves outflanked on the right by a unit of cavalry. This was a telling blow as they were able to destroy two units of the Roman spears and win the game 5-3. 

Conclusion


A fun scratch game with some unusual armies. In hindsight the Romans setup was not ideal - only having 2 light divisions hampered the usefulness of the LI and LHI, so more heavy infantry would have been a stronger army. A stronger guard on the refused right flank and less aggression with the cavalry might have given Rome the win. 


Saturday, 22 July 2017

Stalingrad

For the final test of our new WWII rules (Fire team) we've had a crack at a Stalingrad-style battle in a ruined city. Its a good test of the cover and assault rules as things happen at such close range. The Russians would be on the offensive so had slightly more points (10 vs 8).
For this game the forces were:

Vasily Zaytsev lurking
Russian
4 x Infantry sections (1*LMG team, 1*Rifle team)
2 x SMG sections (1*Large team)
2 x Maxims
2 x Snipers
1 x flamethrower team

German
3 x Infantry sections (2*LMG team)
1 x MG42 HMG
1 x Sniper

The Setup


The table featured dense terrain through-out, with a large factory on the Russians right flank and an open road area in front of it. The objective was for the Russians to capture one of the German Jump Off Points to win the game.

View from the Russian left

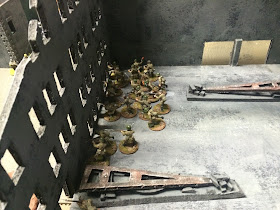
Corner of the factory on the Russian right and the bombed-out road

German left with a JOP in the building

The German right

Close-up of the factory

The Battle

The Germans were required to defend three JOP in their half. Two were in a residential area in the centre of the table and the third in a water treatment plan on their left. One squad was deployed on top each of the central JOPs and the HMG covered the third, leaving one squad as a reserve. The Russians deployed both HMG's on the bombed-out road area to pin the Germans and used the bulk of their infantry to move around the flanks.
 
Russian snipers claim the tower-top

Russians enter the factory on the right to flank the Germans in the warter plant

Russians in the centre trying to tie-down the Germans

Russian SMG team + flamethrower moves to the left flank

German MG42 on the water plant roof

Germans guarding one of the central JOPs

The other central JOP

Close-up of the water plant

Russian base of fire opposite the water plant
The Russians pressed forward with their flanking manoeuvres. On the right they moved carefully through the factory complex that run most of the width of the table and established firing positions facing the water plant. The Germans did not contest the factory so the Russians were able to move right behind them. On the other flank the SMG squad + flamethrower moved through the rubble strewn streets whilst two rifle squads kept the German defenders occupied. 
 
Russians leap-frog through the factory 

SMG team moves forward through the rubble

And now the SMG squad out-flanks the Germans

The Germans wait patiently in the centre

Russians capture the whole factory

Russian LMGS establish firing positions
With the Russians in position on both flanks the final stages of the assault began.
 
On the Russian right a hail of HMG and LMG fire pinned the German defenders now numbering one infantry squad and one MG42 HMG. Two Russian rifle squads then assaulted the water plant destroying the defending squad and securing the JOP. On the Russian left the flamethrower team pinned the Germans before a spirited assault by the SMG squad pushed them back and secured a second JOP.      
 
Water plant now heavily defended

Flamethrower moves into position

Flamethrower pins the Germans 

Russians gather for the assault from the factory


The Verdict

 
In the end a fairly comprehensive victory for the Russians, with superior numbers allowing them pin the Germans before moving in for the kill. In hindsight the Germans were perhaps too passive and relied too much on static firepower from the JOP themselves rather than setting up some overlapping fire zones. Also we agreed that more balanced victory conditions would be 1 captured JOP for a draw and 2 for a win.  

Over watch worked as I had hoped with defenders having the chance to hold fire in the hopes that attackers would break cover and so risk not firing in order to catch them in the open.

With Scipio back in action next week we return to Punic Wars, but the WWII rules now seem fine for the campaign we're planning later in the year.

Saturday, 15 July 2017

Battle of the Tanks

Image result for battle of the tanksHaving largely perfected the infantry combat elements of our home-grown WWII rules , for this weeks game we decided to try out the tank combat rules. This is a bit of stretch as I want the rules to be mostly about squad-level infantry with the odd vehicle to spice-up the games. However its good to try these things out and Hauptmann Grau has yet to field his Tiger in anger, so battle of the tanks it was. 

Table Setup and Forces

A fairly simple set-up for this week. In the centre of the table was a farm and a junction that formed the objective  both sides would attempt to capture.

View from the Russian left


View from the Russian right
The Russians field:
  • 3 x infantry squads
  • 1 x AT squad (2 x 45mm AT guns, 3 x AT rifles)
  • 2 x 81mm mortars
  • KV-1, SU-76, and a captured StuG
View from the German right

View from the German left
The Germans opposing them were:
  • 2 x infantry squads
  • 1 x Stug, 1 x Panzer IV, 1 x Tiger 

 The Battle

The Russians won the initiate and deployed about a half of their forces - 2 infantry sections, the mortars, an SU-76 covering the road, and the slow moving KV-1

SU-76 on overwatch

Infantry backed by the imposing KV-1

The mortars
The Germans were a little more circumspect deploying an infantry squad in the centre and a StuG opposite the SU-76 down the main road. The first action was a brisk firefight between the two assault guns, with the superior German armour (Medium vs Light)  proving decisive as the SU was quickly dispatched.

German HQ takes cover

Germans deploy into the woods

The StuG lines-up the SU-76
In the centre both sides deployed further infantry units and began to approach the farm complex. The Russians securing the farm house whilst the Germans grab the fields and barn.  The Russians deployed the remainder of their infantry, AT guns and also their captured StuG. The Germans still held-back the Tiger, waiting to pounce when the time was right

Russians grabbing the farm house

The Russian armour rumbles forward

AT gun lies in wait

Firefight at the farm
 We now entered the decisive period of the game. The AT guns open-up on the German StuG and were able to immobilise it on the table edge. It could fire down the road but cover meant it was unable to see many targets. With the Germans holding back, the KV-1 was able to secure a hill overlooking the likely German entry point and go hull-down.  


KV covering the road entrance

AT guns fire at the StuG in the distance
As time ran-down the Germans deployed the Tiger and in lucky shot (20-1 odds) it was hit and knocked-out by the KV-1 at close range as it entered the table. This and the loss of the Panzer IV meant that the Russian armour had free reign over the table. So a Russian victory! 

German armour lies smouldering

German infantry clinging-on

 The Verdict

The rules for artillery vs tanks seemed to work well. They have no chance of being destroyed by in-direct fire (unless open topped) but can be pinned, panicked into seeking cover, or damaged / immobilised. Indeed the Panzer IV spent the game buttoned-up and skulking in cover as the mortars rained-down on it.

Tank survivability was hard to judge in this game; the German StuG took a beating but was still operational at the end, albeit immobilised and damaged. By contrast the Tiger was destroyed on the first hit (1-20 chance). I'll make some minor tweaks to give a wider variety of hit outcomes and perhaps to introduce crew ratings.

Next week Stalingrad to test heavy cover