Blog Pages

Pages

Friday, 30 June 2017

Punic Wars - Armati Campaign Week 5

With Scipio now back from Rome, the hostilities resumed.  This week's battle took-place on the Hispania front. Hannibal adopted a slightly different approach for this battle reducing the amount of cavalry and adding additional heavy infantry to bolster the battle-line.


Deployment


Assuming that the Punic forces would try their favoured double envelopment Scipio adopted an unusual but pleasingly symmetric deployment with the flanks blocked by heavy infantry and units of cavalry in the centre. His hope was they might catch the Punic infantry deployed wide and so shatter the line.

Skirmishers covering the Roman right

The Roman right flank - refused 

Roman cavalry deployed in the centre

The Roman right also refused


And finally the more skirmishers covering the Roman left 

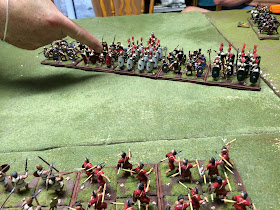
On this occasion Hannibal decided to focus his attack against the Roman left by placing most of the cavalry and his African Veterans on this flank. The right was refused with elephants and skirmishers deployed to delay any enemy advance.


Punic centre

The Punic right with massed cavalry

The Battle

Both sides advanced smartly with the Roman's seeking to breakthrough in the centre and the Carthaginians looking to hook around the Roman left and roll-up the line.   

Hannibal's cavalry on the move

Roman right suffers under massed skirmishers fire
The early stages of the game were very much in the favour of the Punic forces. On their left the Roman's came under heavy skirmisher fire and suffer 3 hits. On the right the Roman light troops were ridden-down by Celtic horse. The innovative Roman cavalry tactics also proved to be unsuccessful as one unit was destroyed (along with a general) and one fell back.  

Celtic horse sweep some lights aside
As the centres clashed things looked grim indeed for the Romans. They lost 2 units to flank attacks from the Punic horse and African Veterans. There were losses in the centre but they had managed to hold the initial attack of Hannibal's large Celtic infantry force.

The Roman left is flanked - things look grip
Over on the Roman right they advanced steadily, pushing aside the skirmishers, and coming to grips with the elephants and cavalry guarding the Carthaginian flank. By this stage it was 3-0 to Hannibal and he seemed to have the stronger position with the Roman left turned.
  
Roman right advances


Elephants get stuck-in 

Now came the critical part of the battle - Hannibal was ahead but his weaker infantry could not hold forever against the superior Romans. Hannibal made two key mistakes at this point. Firstly he failed to advance his cavalry that had flanked the Romans rapidly enough meaning the area was congested for two key turns that restricted the ability of the Veterans to manoeuvre. More critically though Hannibal forgot that he could about face his Veterans and so wasted two critical turns during which he might have been able to roll-up the Romans.

Veterans try to turn the flank but its all a bit congested

Italian horse is trapped and killed but buys valuable time

Once the Carthaginians got moving again it was too late as their centre began to crumble. 3-0 quickly became 7-5 and a Roman victory by 1 unit (the Roman breakpoint being 6 vs Hannibal's 7)

Romans withstand a heavy assault

The veterans pose for a shot 
So a game that Hannibal should have won but failed at the last moment. In hindsight the flank attack became too congested which lost a couple of valuable turns.


Saturday, 24 June 2017

A WWII interlude


With Scipio recalled to  Rome (well on holiday actually) this week we returned to playing WWII to test some rules I'm developing for club use. We've played and somewhat enjoyed Chain of Command but found the Germans too powerful. We played Bolt Action but found it too much like part of the Warhammer family.

So I'm developing rules that try to provide the kind of game we like:
  • The basic unit is the squad with players each controlling a reinforced platoon.
  • It should support 2-3 players a side.
  • Vehicles should be viable but not overwhelmingly powerful.
  • Fire and Manoeuvre tactics should win the day, with pinning/suppression a key part of the game.
  • There should be no command friction mechanics so everyone gets to move all the time.
So the basic elements of the game were set as follows:
  • Firing comes first in the turn so people are "Pinned" and may therefore be out of the action that turn if they loose the firefight.
  • Assaults will be bloody and somewhat risky affairs for both sides.
  • Shooting will be based on Fire Points that translate into dice rolled for hits. The 1/2/3 hits cause Pins but additional hits cause kills.
  • Morale is solely about how may of the squad remain.

Setup     


For this game both sides had a platoon of infantry - 3 squads for Fallschirmjäger and 4 squads for the Finns / Russians, who were also reinforced by an HMG, 2 light mortars, and a sniper.

We went for a simple "capture the flag" scenario with each side holding an objective and trying to capture the others. I've adopted a version of the Chain of Command Jump-of-Point concept to give an element of hidden movement, so the game began with an empty table.

View from the Finnish side - the broken-down 251 is the German objective

Close-up of the 251

View from the German side - the hut is the Finnish objective

Close-up of the hut


The Battle


The battle began with the Germans deploying all their forces onto the table in the first round. One squad held the objective, one was close by in the third advanced on the Finnish hut in the cover of a hill
FSJ deploy to protect the 251

FSJ capture a hill near the hut
The Finns responded by deploying the bulk of their units in the centre to protect the hut. Two squads of infantry deployed on the left-hand side to threaten the 251. 

Finns on the left

Holding the centre
As the game settled into a fire fight the Finns used their superior numbers to surprise the Germans. Infiltrating through the centre of the battlefield they managed to flank the squad protecting the 251 and threatened to overrun the position. 

FSJ exposed and flanked
To test the rules the Finns launched and assault into the FSJ flank, but were beaten back by the more experienced Germans.

.
Finns / Russians holding the hut
The game ended in  a draw as it was clear neither had the strength to dislodge their opponent from their objective.

Verdict

So the good points:
  • The game was pretty fast and the turn sequence worked well enough.
  • There was plenty of movement in the game
  • Artillery was fun to use

The bad points:
  • Shooting needs to be more deadly - probably about 50% more. Whilst Pinning was fairly straightforward there were very few deaths / combat non-effectives.
  • Assaults need to favour the successful attacker who gets into a good position. 
So a number of tweaks needed to increase the decisiveness of shooting and make Assaults reward the bold.

Saturday, 17 June 2017

Punic Wars - Armati Campaign Week 4


The fourth week of the campaign sees us return to Italy where Hannibal is once again in the offensive attempting to move from Umbria to Piceni as he seeks to threaten Rome itself. This week we are trialling a new reinforcement system where all reinforcement cards are available to the commanders rather than just those for conquered territories. The intent was to provide a wider range of troops to the Romans to spice-up the games. This was partly successful with the Roman forces featuring Numidian light horse and the Carthaginians some elephants.

Deployment


On this occasion the Roman's adopted what appeared to be a fairly defensive formation on the presumption that Hannibal would again attempt a double envelopment. The Roman's left was guarded by heavy infantry and was angled back to increase the time taken to envelope it. The Roman's right was much stronger containing all the cavalry and the Triarii in the hopes of entangling the Punic horse long enough to create a flank attack with the heavy infantry.

The compromise in the position though was that to create enough frontage for the overlap the Romans had deployed several units in width not depth, risking them being swept away if they were fighting the Celts.
Roman left with flank guards in place

Roman Centre

Roman right - cavalry ready to engage

Roman right - Triarii ready to create the flank
Although Hannibal enjoyed a cavalry superiority it did create a dilemma for him. In order to have flexibility with his elephants and African Veterans he would need to create heavy divisions containing two units of heavy cavalry. These are unwieldy beasts making it hard to outflank an opponent who is not foolish enough to advance and almost impossible with two such divisions on the same flank.

So the cavalry was divided equally between the flanks with the Veterans deployed close-in on the right side to hopefully do the real damage.       

Punic left - a large cavalry force supported by elephants

Punic centre - a polyglot of Libyans, Greeks, Spanish and Celts

Punic left - African Veterans and another cavalry force

The Battle


On Hannibal's left be battle began with both sides advancing towards the centre. The Romans were seeking to avoid the elephants with their Italian horse and destroy them with them light troops. Some careful manoeuvring allowed the Italians to engage the Celtic cavalry opposite them while the lights delayed the elephants progress. Hannibal deployed a cloud of skirmishers to weaken the Triarii who moved to support the Italian horse.  

Hannibal advances his left wing
 
Elephants become engaged with the lights 
 
Triarii move to cover the cavalry 
 
Believing that the Triarii had moved too far from the flank of their main line Hannibal pushed forward in the centre in the hopes by-passing them to launch an assault on the main line while his African Veterans sought to turn the Roman left. This saw an earlier than usual clash of the heavy infantry in the centre. With the Romans deployed well-back and slightly angled it did mean though that the African Veterans took an additional move to come to grips with the enemy.  It was a risk though as the wider Roman line left a unit of Hastati in flanking position on Hannibal's left.  


The lines clash with a potential flank exposed

Celt-Iberians push into the Romans

Back on the Roman right it was a mixed time for Punic's. They managed to catch a unit of Italian horse with their elephants but were only 2 moves from a deadly flank attack on their own left. Things looked grim for Hannibal. 

Elephants mash some enemy horse - stomp stomp 

The Roman flank attack is poised
At this crucial juncture the Veterans and Celt-Iberians crashed into the Roam left flank with deadly effect, sweeping away several Roman units deployed wide and the Celts especially performing above expectations.

Veterans join the fray

Celt-Iberians bring on the pain

As the Roman's lined up their flank attack, Hannibal won the imitative and was able to kill enough of the Romans to win the game before the attack could be launched, scoring a 6-4 victory.

Both sides tangled-up on the Roman right

Hard shoving in the centre

The Roman left where all the damage was done
So the heroes of the day for the Punic's were certainly the Celt-Iberians who broke through the Roman line just in the nick of time. 

The Victors


Charge

Conclusion


A close game and one that only swung to Hannibal in the very last move. In truth both players made some errors. Hannibal wasted half his cavalry as it became stuck wide on the Roman's  refused left and took no part in the game. The Roman's could perhaps of used the Triarii to assault the Punic's flank instead of turning outwards to support their cavalry.