Blog Pages

Pages

Saturday, 24 September 2016

Chain of Command Eastern Front campaign - week 2

As the Axis forces failed to break-through last week they were forced to undertake a second Probe mission across the same terrain as week 1. However the higher echelons were not so generous this time with their support and they only had a single panzerschreck team for assistance.

Long view of the table
For this week's game the Finnish player unveiled a special rule that allowed the Finnish patrol markers to operate independently and not keep the usual 12" from another. As a compromise we allowed two of the five patrol markers to be Finnish. This was to have a massive bearing on the outcome of the game.

The game began with the Finns able to manoeuvre their patrol markers  to within about 6" of the table edge, which with the heavy cover meant they had two jump-off points with one or two moves of the base-edge. As the objective is for the Axis to exit two teams from the table they began almost in a winning position.

Finns in the distance occupying the woods
The only chance for the Russians was to quickly deploy their maxims and hope to pin the Finns as they dashed across the small piece of open ground between them and victory. Lady-luck intervened again for the Axis though, giving the Finns 4 phases in a row due to some very helpful initiate dice. So the Soviets first phase of the game saw one Finnish team already off table and a further two ready to exit.
Maxim deploys into the fields
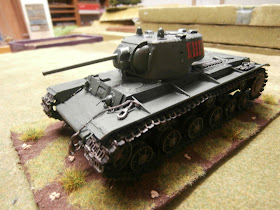
So the Soviets deployed some troops to try and pin the marauding Finns but focused their effort on making life tough for the Germans. Significant amounts if infantry and the mighty KV-1 were deployed to ruin their day. The Germans quickly found themselves knee-deep in Russians and their panzerschreck team failed to find their mark.

The Soviets pour fire into the Germans
 In the end though the Finns got the dice they needed and strolled largely unhindered from the table. So a success Probe for the Axis.

The Finns snatch victory from the jaws of ...er...victory
The Finnish special rule on patrol markers is a bit of game breaker in most scenarios, especially when playing on a larger table. In many games it would be tough to prevent them deploying straight into a winning position. So we have decided to dump it for future games but reclassify the LMG to be 6 dice vs 4, so the same as the Russians.   

Sunday, 18 September 2016

Chain of Command Eastern Front - week 1

The campaign opened with the German Fallschirmjäger probing the Soviet defences. The Russians were dug-in in a series of fields and woods covering the main road towards the besieged friends of the Germans.

The battlefield

The Germans made a bold move by deploying their armour (a Marder III) right at the start of the game.

 It was immediately ambushed by a concealed Soviet AT gun that ripped through the thin Marder armour like a knife through low-fat vegan spread.

Burn baby burn
Denied their armoured support the Germans now deployed their infantry in cover of the table edge. The Soviets reciprocated occupying the woods and fields opposite them.

German 1st Section

German 2nd and 3rd sections

Commissar Bosski encourages the troops

Russians sir, thousands of um

Yet more soviets
The game settled down into a fire-fight with Hitler's buzz-saws rattling away at the Russians. The Germans focused their fire on the Soviets occupying the woods to their flank. The combined fire of 6 MG 34's proved highly effective first pinning and then routing both an infantry section and a maxim. 
Tough times in the woods
However the scenario required the Germans to advance to try and exit the table edge, so undercover of the 1st sections MG 34's the 2nd and 3rd sections tried to storm forward to capture the woods.

Charge!

25% casualties

50% casualties

Feeling lonely

Yes gentle reader you guessed it, the combined fire of a maxim and 2 Soviets sections took a heavy toll on the Para's as they toiled forward across the muddy fields.
 
So with the Marder and 2/3 of the infantry out of action the German commander called-off the attack and they returned to the start line - first blood to the Soviets  
    

Chain of Command - Eastern Front Campaign

Introduction

This is a generic "ladder campaign" for Chain of Command that features an attacking force seeking to breakthrough to a strategically important town to relieve allied units trapped there. There is an option for fighting within the town to supplement the main action should there be sufficient players. 

Campaign moves


The main action starts at the "Probe" point with RED attacking. You then follow the flow-chart depending on the battle outcomes fighting battles as you go. The terrain will be different for each battle AFTER the first two.

 If sufficient players are available then you may also fight in the town. This starts with a "Patrol" mission and then proceeds depending who gets the upper hand. The terrain may be the same throughout to depict a strategically vital area of the town. It does not matter if less turns are fought of the town battles than the relief force.

Casualties

After the game some casualties may recover:
·         All those wounded will recover.
·         50% of those killed are dead.
·         25% of those killed miss 1 game.
·         25% of those killed are available for the next game.

If you feel you are too weak to fight then you may cede victory but the enemy gains +3VP.

Victory Points


Victory Points are earned from each game:
·         Win scenario = +3 VP
·         Each jump-off captured = +1
·         Each whole squad lost = -1
·         Each 10 men lost = -½ (Green troops do not count as they are easily replaced)

 VPs may be spent during the next battle. 1*VP can be used to buy 1*Force Morale or ½*Reinforcement Point. Infantry squads may be bought to replace core losses using the reinforcement cost.


Multiplayer Supplement


Sometimes on club-nights it's easier to run a single large-game, rather than two smaller ones as a better way of keeping everyone involved. So the following additions are used.

1. Most of the battles are fought using the relief column, with 1-in-4 games being the FIBUA.

2. For the relief column:
·         We play with two platoons a-side, using the rules for multiple platoons in the "Large Chain of Command" supplement published on the games website. Essentially you have separate activation dice and morale on an 8" table with an additional patrol marker and jump-off.
·         The Axis forces are Elite and the Soviets are Regular.

3. For the FIBUA games:
·         We play with 2 x 2/3 sized platoons (so 1&1/3 platoons) acting as a single large platoon.
·         Force morale is average and there are 7 shared activation dice
·         You receive a 25% bonus on reinforcements
·         The table is 6"

Saturday, 10 September 2016

Chain of Command - Stalingrad-ish

In preparation for our upcoming Chain of Command eastern front game, this week we tried out the rules for FIBUA using my Stalingrad terrain. We opted for 2 * 4" tables and made the forces about two-thirds the usual size.

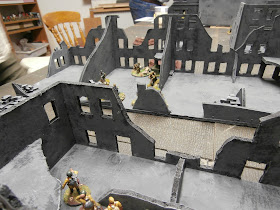
One area  was industrial with some shell-cratered open areas. The other was more residential with narrow streets and rubble. Table 1 pitted Soviets against Finns and Table 2 Soviets against German Fallschirmjäger.

We ruled that you could not see over a single wall, so only troops against a wall were visible to fire, We also treated building interiors as hard cover due to the rubble etc. As we're still learning the rules we timed-out on both games with the Soviets slightly ahead on one and the Finns on the other.

The Residential zone

On this table the Patrol Phase proved pretty even, with both sides deploying in decent cover. The Soviets did most of the manoeuvring but the flank attack by an SMG squad proved a disappointment as they became pinned by the German LMG fire. Heroes of the people this week go to the chaps who hauled a maxim into and upstairs window to rain fire on the Germans.

The Soviet deployment with Germans just visible at the top

The second Soviet squad digs in

The German seize a building - this will be their home for the rest of the game

The German sniper takes up a good position

Soviet SMG squad sneaking-up on the Germans

The Soviets launch an assault

Heroes of the revolution

The Industrial zone

Here the Patrol Phase heavily favoured the Finns, with the Soviets pinned-back onto the table edge and one corner. Again the Soviets made the running advancing boldly and managing to neutralise a Finnish jump-off point in the edge of the factory. They attacked valiantly but lost a squad to focused fire from the Finns (not easy to say!)

 
Soviets capture the water works - I think that's worth £200

Inside the large factory

Ruined factory with the waterworks behind

Soviet snipers find a hide

Soviets and Finns square-off 

View down the road - not much cover their gov


Sunday, 4 September 2016

First Battle of Newbury, 1643 - Part II

You will remember from last week's Blog that at the half-way point things were fairly even overall. Rupert's Horse was making good progress in the south, but the centre was firmly going Essex's way. Honours were pretty even in the fields to the north. Tune in next week for the conclusion.

The Northern section

In the Northern section of the field the Royalists pressed forward with both Foot and Horse in an attempt to force the flank of the Round Hill. The attack met with an initial set-back when the lead unit of Foot was routed and the Parliamentary Horse surged forward into the stationary Royalist cavalry.
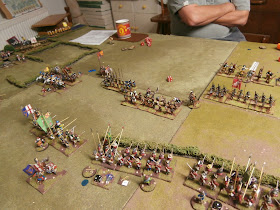
Royalists advance into the teeth of the defence

View from the Royalist lines

The attack stalls as the roundheads counter attack
All this came to a shuddering halt though as the roundheads came up against a very lucky streak from the Royalists. They saved all the hits against them  and so threw-back the Parliamentary Horse, reversing all their gains and threatening to turn the flank. 

Luckiest men alive
Essex deployed most of his reserves to stabilise the position. the fresh Foot proved up the task and the battle quickly became a stalemate.
Fortunes reversed 

The action bogs-down

The Centre Section

In the centre the action began with The King throwing his reserves into the assault on Round Hill. They advanced boldly but were unable to make any dent in the defences around Round Hill.

Reinforcements for the Royalist cause

The attacks goes in 

The attack waivers

The Southern Section

Both sides received fresh squadrons from their reserves but Rupert's previous success saw him start with the upper-hand. He attacked boldly but the roundheads were able to rally some of their fleeing units and although at a disadvantage mount some sort of defence. 

Roundheads return to the fray

Rupert fights his way forward
This was in truth just a delaying action though, as Essex knew his tired troopers would not be able to hold Rupert for long. He used the time wisely to deploy a defensive line that refused his flank. 

Essex forms a solid defence

The Verdict

The game ended with the Royalists having taken valuable ground, but now lacking the strength to mount a serious assault on Essex's lines. Round Hill was secure and indeed had never been seriously threatened during the battle. Its guns were also intact following some very poor counter battery fire from the Royalist gunners. This proved decisive in holding back the Royalist tide.

So somewhat similar to history, which is not a bad result. It was also enjoyable to see almost all the clubs collection of ECW taking to the field at once. An inspiring sight, and we'll certainly undertake another ECW campaign soon, perhaps northern England so we can deploy the Scots again.