Blog Pages

Pages

Thursday, 31 December 2015

Montrose Highlanders complete

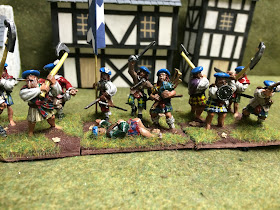
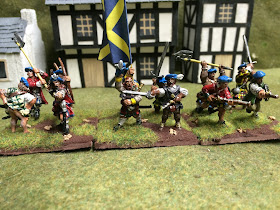
After about a year of painting my Montrose army is now complete. Over the Christmas period I've managed to polish-off the three units of highlanders. Fortunately for me the tartans were a lot less elaborate in this period than later on.

They have a good mix of weapons so would do for anything from the ECW right through to the Jacobite rebellions

The unknown figures from Colonel Bill

Cheeky highlanders

The second unit

Just a wee dram

The completed brigade


Two of the units are Warlord Games metal figures and the third is an unknown manufacture bought from Colonel Bill for the princely sum of £10. A word of warning though - the Warlord Figures seem to come in two distinct styles, with one noticeably taller than the other, so be careful how you mix them.


Monday, 28 December 2015

Lion Rampant Campaign - Week 2

Campaign Standings

Saracens: 8 Glory Points
Crusaders: 9 Glory Points

Just the one game this week as most folks were recovering from the exertions of Christmas. This weeks scenario was The Messenger

The Messenger: Crusader victory - 3 Glory

A pretty simple set-up for this game - the Saracens had to escort  a messenger from one corner to the other. If the messenger was killed by a lucky blow or the escort being destroyed it would be a Crusader victory, otherwise the Saracens win.  Both sides deployed most of their troops in opposite corners, with a small Crusader force of foot sergeants guarding the exit
 

The Teutonic blocking force guards the exit

The Teutonic interceptors

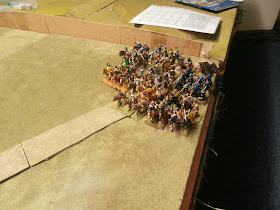
The Saracens - is that a ruck or a maul?
 
The early turns saw excellent movement dice from the Teutonic knights but very little activity from the Saracens. It looked like they might be trapped in the starting corner with barely a move.


Saracens making slow progress under crossbow fire
 
The light horse evade and cause a few casualties - the next turn they were caught and killed

Eventually the Saracens got moving and split their units either side of a wood on the left of the table. At this point the Teutonic mounted knights rumbled into action but were skilfully taunted into first charging some foot sergeants and  charging into the wood where they met their end.  


The heavy armour heads cross-country 


A killed zone in the centre
 
The knights charge


But help is on the way for the Saracens

And the knights are no more

After a hard slog the centre was cleared and a game of cat-and-mouse ensued that eventually saw the Saracens on the table edge and just a move away from victory.

The black guards defend the messengers unit

Then... twang,,,, thud.... disaster, an  incredibly lucky shot from the Crusader crossbows saw the messenger felled as he left the table. So a last gasp Teutonic victory and their first of the campaign or practice games. 

We've won!
 
We've lost !

New Rules

One thing which has been a bug-bear in the last few games is the prevalence of people failing to move at all as they have a activation failure on their first or second unit. Part of the game but it gets tough if you get a string of them. So a new rule was tested, based on garden cricket - "Can't be out first ball"

Can't be out first ball
  • If your first voluntary activation (not rally or wild charge) fails then you may re-throw that attempt.
  • It must be the same unit with the same attempted action
This seemed to work pretty well as its takes the sting out of a very early failure. It might tempt you to try a slightly riskier activation as your first but perhaps that's no bad thing.
 

Marston Moor refight - the Cirencester Christmas game

The Scenario

The full details of the scenario can be found in my earlier post, but as a quick recap we were refighting the Parliamentary / Scots army against the Royalists under Prince Rupert.


As we were fortunate enough to have 7 players we opted for 4 Parliamentary and 3 Royalist.

The initial phases

Marston Moor is classic ECW with mounted on the flanks and foot-sloggers in the centre. Its a fairly flat battlefield, with the ditch being only a minor obstacle. The scots bonnets add a dash of colour and the largish numbers of dragoons are a welcome sight.


The Parliamentary right


The Royalist right - the horse are out of shot

The Royalist left
The game began with a general advance from the Parliamentary / Scots troops, with Rupert content to let the enemy come to him for once. Honours even from the early exchanges.

The action on the flanks

Whilst the infantry exchanged fire in the centre both flanks clashed. On the Parliamentary left Cromwell advanced his elite Ironsides against a weak'ish force or Rupert's Regiment and the Northern Horse, later supported by the Life Guards. It was slow going with the Ironsides reluctant to charge  but gradually warring-down their lower quality opposition. The scots proved useful though sweeping away a troublesome gun battery before it did too much damage.


Cromwell advances


The action from the Royalist side


Cromwell makes progress

On the Parliamentary right the action was faster-paced with Thomas Fairfax making short-work of Goring's horse and turning the flank of Royalist line.

Battle is joined

Fairfax turns the flank

The Royalist infantry look worried

The End Game

With their flanks lost the Royalist infantry were losing heart having suffered heavy attrition from accurate Parliamentary musket fire. They began to retreat leaving only Newcastle's White coats holding the right of the line in good order. As the game ended they offered the only meaningful resistance.


The Royalist right crumbles

The White coats hold firm

Reflections

The game had the benefit of largely following history, with the White coats not though forced to fight to the bitter end. We also had an impressive looking game with about 15 units of foot and 12 of horse a side, all in 28mm.


Friday, 25 December 2015

Teutonic Knights - lion rampant army

Following some disappointing showings in the first few games we have revised the army list to be less dependent on the mounted men-at-arms. Hopefully this gives a more flexible force.

1 * Mounted men-at-arms
1 * Mounted sergeants
1* Foot men-at-arms
1 * Foot sergeants
1 * Crossbow
1 * Foot sergeants or crossbow
1 * Bidowers

 Figures are mostly from Richard's collection with a few of Mike's crossbowmen at the end.
Heavy metal - mounted men-at-arms

The standard bearer

The Grandmaster

Hard as nails - two units of foot men-at-arms

The crossbowmen

Thursday, 24 December 2015

Lion Rampant Campaign - week 1

Campaign Standings:
Saracens: 8 Glory Points
Crusaders: 6  Glory Points

Week 1 reports

In a bumper week we managed to complete three battles:
  • Hammer and Anvil; Saracens (Stu)  vs English (Mike)
  • Hold on Tight; Saracens (Roy / Bruce) vs Teutonic's (John)  
  • The Bridge; Saracens (Roy / Bruce) vs English (John / Stu)
The advantage lies slightly with the Saracens and some tweaks are needed to the Teutonic army to make it more flexible.

Hammer and Anvil; Draw - 3 points each

The English were defending so deployed 2 units of archers, the bidowers, and a unit of foot sergeants as the blocking force. This left the foot men-at-arms and a unit of foot sergeants as the hammer.

The game started well for the Saracens as their large cavalry force slipped easily past the waiting archers and the infantry made steady progress, leaving the English men-at-arms in their wake. As always though the dice turned and three turns of no movement left the Saracens in a real pickle, with battered infantry units bogged-down and the men-at-arms slowing gobbling-up units. What looked like an easy win ended a draw as all the mounted escaped but the foot died to a man.  

The English anvil


The Saracens advance


Catch me if you can


Oh - seems you can!

Hold on Tight; Saracen win - 5 points

The scenario requires both sides to capture and hold a cross-roads. Both sides adopted a similar deployment with mounted on the flanks and foot sergeants in the centre looking to hold the objective.

The early exchanges were dominated by the Teutonic men-at-arms refusing to indulge in anything so gauche as actually moving towards the enemy and so the Germans sat resolutely on their base-line while the Arabs captured the cross-roads. After enduring an archery barrage they eventually trundled forward but met with limited success, chasing skirmishers and eventually perishing. Even the usually rock-hard foot men-at-arms were repulsed by the Saracen foot.    


The Saracens advance unmolested - its quiet, too quiet...

The Teutonic's hold firm 


The Germans fight back, but is it too late?


The knights are steadily worn-down

The Saracens are left in charge

In hind-sight an army with two units of mounted men-at-arms is not suited to many of the scenarios, the 7+ to move can prove hard to pull-off every turn.

The Bridge; English win - 3 points as defender

As the defender the English deployed a unit of foot sergeants on the bridge in hedgehog and the remainder along a ridge to the rear. The Saracens deployed with both foot and horse archers to the fore.

The Saracen plan was to bombard the unit of the bridge with  archery and then secure it with their own spearmen. Initially this worked well as the English appeared happy to stand-back and watch their forlorn hope shot to pieces. When they eventually advanced things looked bad with Arab light horse sneaking across the bridge and heavy cavalry bearing-down on the ford.

Better late then never though and the tide began to turn. The Arabs at the ford were beaten-back with heavy losses from a unit of English foot men-at-arms and some archers. At the bridge a second unit of men-at-arms stormed across supported by increasingly accurate English archery. Although destroyed, the knights bought time for the remaining English units to converge on the bridge. Suddenly its was the Saracens in trouble as their morale crumbled and with darkness falling they lacked the strength to capture the bridge. An unlikely looking victory secured for the Crusaders.

The doughty English

The sneaky Saracens


The English forlorn hope meets its end

Arab light horse sneak across the bridge

The English hold the ford and turn the tide

The bridge ends in English hands